Table of Contents

Class
Weapons


Hammerblow
+25% Impact for 3.5s on Hit. Stacks 5 times.
Opportunist
+25% Rending vs Staggered Enemies.

Run 'n' Gun
You can Hipfire with this weapon while Sprinting. +15% Close Damage while Sprinting. Also reduces weapon spread at all times by -30%.
Trickshooter
+6% Strength on Chained Weak Spot Hit (Any Target). Stacks 5 times.
Curios

+17-21% Max Health
+13-17% Toughness
+13-17% Toughness
Talent Tree
Description
Who in their right mind would say You cannot tank in this game? Maybe they haven't tried hard enough... or are too lost in the mindset of 'I have to rush forward otherwise I will be overwhelmed and lose due to 'punish waves' '
I did... and here is the build that shows You (I hope) its possible!
TIPS:
1. Range weapon is a personal choice but You should have a quick response one in order to deal with incoming Specials and the fact You will be at the frontlines where Flamers and Trappers will be coming after You
Breakdown of best choices from Top to Bottom Tier:
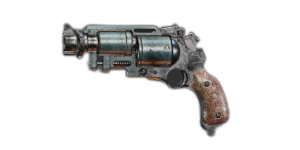
A) Revolvers (preferably Zarona; its nice at sniping if You don't get suppressed and can use Gloryhunter for good toughness restoration when fighting Elites while Agripinaa is great againts Unyielding but falls off at long range engagements due to accuracy spread)
B) Bolt Pistols (Lethal Proximity makes Arbites Grenade radius absurd and Puncture does not need explaining how good it is; You could also consider Gloryhunter for good toughness boost when fighting Elites)
C) Exterminator Shotguns (preferably Mk VIII because of tight spread and useful brittle slug, both fall off at long range engagements)
D) Combat Shotguns (preferably Agripinaa for slug shots which is usable at long range engagements or Accatran for burn DoT utility and suppression)
E) Shotpistol (offers nice protection againts range attacks when caught in the open or peeking over covers while under fire but taking it makes Your overall mobility pretty bad; falls off at long range engagements)
F) Shredder Autopistol (falls off at long range engagements but its great at staggering; can accumulate Forceful stacks fast)
G) Infantry Autoguns (they do not pull as fast but compensate with the rate of fire and acceptable long range capabilities; can accumulate Forceful stacks fast)
H) Braced Autoguns (they do not pull as fast but compensate with the rate of fire and suppression; they fall off at long range engagements; can accumulate Forceful stacks fast)
I) Vigilant Autoguns (they do not pull as fast but they have acceptable long range capabilities; long reload speed and poor reactiveness makes it not as preferable in comparrison to other options)
J) Double Barrel Shotgun (falls off at long range engagements; less preferable)
K) Boltguns (Very slow to pull out with a very slow reload; best not to take it for this build)
2. You can use Shock Mines instead of Arbites Grenades however IMO Arbites Grenades are better due to damage, reactiveness and Boss stagger capabilities
3. Shock Maul and Shield offer tremendous CC and survivability not only for You but for Your team due to special action; the flash. Perks and Blessing choices are important;
- +25% damage againts Carapace and Unyielding maximizes damage againts the most beefy targets; it is better to amplify the damage on those specific health bar types (not to mention Maulers, Plasma Gunners and Twins heads aswell as Scab Ragers torso)
- Hammerblow is the key blessing that makes the build effective; it allows for consistent stagger and work very well with the ability of choice which will be more about below
- Opportunist is yet another key choice in the build; together with Strike Down and Concussive talent it allows You to gain 40% rending on melee as long as You stagger or hit a weakspot of an enemy - this grants Armor Damage Modifier (ADM) AGAINTS EVERY HP TYPE AFFECTED BY RENDING ABOVE 1.0 ON ANY ATTACK!
Many people choose High Voltage blessing usually instead of Hammerblow; this IMO is a mistake - due to immence CC majority of the enemies will not even have a chance to strike You - only Bulwarks and Crushers become a problem due to stagger immunity after suffering a certain stagger tier. This is where Opportunist comes in together with Strike Down and Concussive talents; You kill the most dangerous enemies faster while nullifying the rest due to Hammerblow impact stacking
4. Special action is usually slept on and thus people usually also dump Power Output in favour of Defence - this IMO is a mistake;
Defence provides the following;
80% vs 60%
Dodge Distance; 0.88 vs 0.86 (such difference is not even noticable by the more experienced players of this game...)
Dodge Limit; 2.8 vs 2.6 (no change; You still have 3 dodges cause the game rounds up numbers)
Sprint Cost; 1.85 vs 1.95 (You should NEVER sprint with this weapon - slide dodging at best to close the distance with the enemy)
Push Cost; 0.7 vs 0.9 (one of the main reasons to favour Defence over Power Output and yet its still not worth it - stamina management on Arbites is very good to begin with and this weapon is no exeption due to attack combos)
Worthy of note; increasing Defence makes block cost more efficient... however mainly You will be blocking ranged attacks and those do not deplete your stamina significantly enough to favour Defence; blocking overheads or ANY melee attack exept for bosses is not desirable either - its better to dodge/stagger the enemy instead...
Power Output provides the following;
80% vs 60%
Range; 20m vs 18.15m
Angle; 0.68 vs 0.63
Now one might think that 1.85m extra range and 5 degree angle is nothing until You realise that the suppression provided by the flash can stop enemies affected by suppression even at the very tip of the radius (yes; it stops even Reapers from shooting regardless of range as long as they are hit by the flash!). Apart from suppression it also provides stagger that works differently to each enemy (nobody EVER talked about it anywhere... which is mindboggling to me...)
Here is the list of safe distances where the stagger from the flash will always occur (with exeptions);
Dreg Shooters, Scab Shooters, Scab Stalkers, Both Bombers, Both Flamers, Dogs; <=13m Medium Stagger
Poxwalkers, Groaners, Both Bruisers, Snipers, Trappers; <=11m Medium Stagger, <=13m Small Stagger
Dreg Shotgunners; <=10m Medium Stagger, <=13m Small Stagger
Scab Shotgunners; <=8m Medium Stagger, <=13m Small Stagger
Both Gunners; <=9m Medium Stagger, <=13m Small Stagger
Both Ragers; <=11m Small Stagger (take it with a grain of salt; most likely if used at this range when they are attacking someone else they won't be staggered - close the distance!)
Bulwarks, Crushers; <=7m Medium Stagger (can interrupt overheads, opens Bulwark shield UNLESS Your flash hits their back!)
Maulers; <=7m Medium Stagger, <=11m Small Stagger (can interrupt overheads but only at close range!)
Reapers; <=10m Small Stagger (interrupts shooting animation)
5. You can use ANY ability with this build truth be told altho the talent cost is different for each one in order to make them the most effective;
Castigators Stance; 1 - 2 (if You plan to use just the ability with no augments You can put the spare point into Arbites Vigilant; it synergizes perfectly with it - even better than with Break the Line where You lose Your main source of Damage Reduction for a minor offensive boost)
Break the Line; 3 - 4 (best thing to drop for those is Will of the Lex and Target the Weak if You plan to use Engage augment too)
Nuncio-Aquila; 2
6. My personal choice for the ability is dictated by the natural synergy between it and the melee and blitz choice. You hold Your ground, keep the enemy staggered in the radius and rip the benefits of buffs and debuffs applied to Your adversaries. It has many implications - remember that Your tools are only limited by the rules applied by the game and Your own creativity/strategic thinking!
Thats about it! I hope You will see how impactful (see what i did there?) playing defensively and strategicaly can be instead of always being pure offence and following the foolish idea of 'Best CC is to kill the enemy'!