Table of Contents

Class

Weapons


Uncanny Strike
+24% Rending on Enemy Weak Spot Hit for 3.5s. Stacks 5 times.
Precognition
+60% Finesse Damage for 2s on successful Dodge.

Blaze Away
+8% Strength for every 10% of magazine spent during continuous fire. Stacks 5 times.
Pinning Fire
+5% Strength for every Enemy you Stagger. Stacks 5 times.
Curios

+13-17% Toughness
+13-17% Toughness
+13-17% Toughness
Talent Tree
Stimm Lab
Description
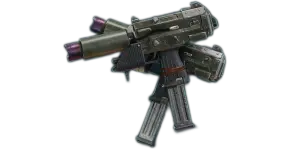
This is basically the same build as the first Scumlinger build, however, with the Uzis, we trade the consistency and spread of the Vraks Mk V Infantry Autogun for the Branx MkIII Dual Autopistols's raw damage output. So this build is better suited for quick damage and loose crowd control.
This build will be updated as I continue to play and get a better feeling on it.
After Rotten Armour finally got out of rotation, we can play Scumslinger freely, and it's plenty of fun and effective with the proper team.
Suggestions/Alternatives:
- If there's a Veteran in your team, and he's not running Krak Grenade, feel free to swap Chem Grenade with Boom Bringer.
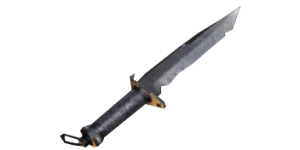
- The Catachan Mk III Combat Blade is mainly for mobility, you can swap it with Improvised Mk I Shivs if you desire.
- Feel free to play around the stimm lab with whatever feels better for you as long as you can keep Chemical Dependency up.
- You can use the Catachan Mk I "Devil's Claw" Sword as a defensive melee alternative.
- The Curios aren't set in stone, just don't waste a perk slot for Damage Resistances. We are avoiding damage here.
- The Branx MkIII Dual Autopistols have awful crit ratios and don't chain crits. So we can dump the crit-related nodes for either extra defence or whatever fits your playstyle.
HOW TO PLAY:
Your main role is to be the damage dealer, boss softener/killer and elite killer (excluding crushers and bulwarks facing you). Most of the time specials aren't that far away of your effective range, in which cases you don't have much of an excuse to not kill them. However, there are things you should keep in mind:
- Use your stimms as early as you can to max out Chemical Dependency.
- This build takes the full stimm lab for reload speed and rending, the latter helping greatly against general elites, and combined with Enhanced Desperado, deals very good body damage to the Karnak Twins (Not advised to actively shoot them unless there's nothing better to do. Best scenario is after their shields are broken and they are stunned momentarily, you should be able to deal roughly 25~K damage with a single mag. dump safely.)
- You're made of paper, but pack constant reliable damage against everything that isn't a Crusher or a Scab Captain shield. As such, your mobility is the main thing keeping you alive, aside Enhanced Desperado's passive ranged immunity, so ALWAYS be dodging. Talents like Hive City Brawler, Burst of Energy, Tis but a Scratch and Chem Fortified help with chip damage, don't rely on them to tank any damage. The best way to not die is to simply avoid damage altogether, and you should be good enough at that.
- Always stay with your team. It feels incredibly redundant to say, but too many players apparently are too eager to go on solo adventures and inevitably die. Your team is your best defensive resource, and you're their best damage source, so you should be complementing each other and covering your weaknesses while enhancing your strengths. The only times you should stray from your team, be it for ammo if you somehow ran out, quick loot check or dispatching a ritual from Heinous Rituals. In such scenarios, you should give your team a heads-up or ask for quick cover, otherwise, just bite the bullet and blame yourself.
- If no one is gonna use a grenades pickup, dump whatever you have left before picking it up. It's not mandatory nor necessary, but if the opportunity arises where it's worth doing, just do it. It can certainly help if the team is not returning to that room or the box is before a drop off.
- If a Captain or the Twins spawn, your main role is to keep the horde and specials at bay as your team deals with them. If Rinda Karnak or Scab Captain are targeting you, just avoid them and DON'T drive them into your team, you can just hold sprint+w in circles to have Rinda off your mates. If Rodin Karnak is targeting you, you can just poke him at range while cleaning hordes and specials as long as you keep dodging his shots or got Enhanced Desperado up.
- When running Boom Bringer, don't waste it on bosses nor hordes. It should be a panic prevention button, as it's too slow to pull up in an emergency, or to help a teammate revive. But if you're running Chem Grenade, you should use it to prevent hordes swarming an area where a boss currently is or gonna be fought in, help secure a revive/objective, ease up a room with too much pressure or prevent such pressure. Their usage ultimately comes down to your game sense, as situations can vary a lot.
- Avoid giving your Ogryn backshots.
- Take full advantage of Enhanced Desperado's ranged immunity. As you can run to Scab Gunner's faces, draw their aggro and easily kill them if your team is being pinned down, or prevent such situation from happening entirely. However, if there are Reaper, they should be top priority alongside Specials in general.
- Don't shoot any Poxburster near your team, only try to kill them if you are SURE you can safely dispatch them before they can pose any threat to the team.
- Avoid picking up ammo if you have teammates that make good use of it.
- Unlike the Vraks Mk V Infantry Autogun, the Uzis chew through way more ammo, so if you're mindlessly shooting, don't be surprised to be out of ammo. Try to always keep at least one reserve magazine