Table of Contents
Ogryn Build - Warhammer 40k: Darktide
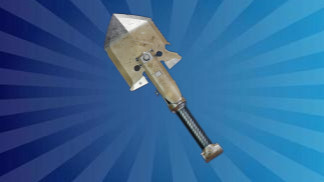
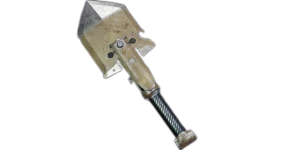
Ogryn Shovel Knight
Ogryn Build - Warhammer 40k: Darktide
Class

Weapons


Thrust
Up to +20% Strength based on the charge time of your heavy attacks. Stacks 3 times.
Brutal Momentum
+15% Weak Spot Damage. Weakspot Kills also ignore Enemy Hit Mass.

Blaze Away
+9% Strength for every shot fired during continuous fire. Stacks 5 times.
Inspiring Barrage
+4% Toughness for every shot fired during continuous fire. Stacks 5 times.
Curios

+17-21% Max Health
+17-21% Max Health
+13-17% Toughness
Talent Tree
Description
"Boss says I hit 'em so hard with the shovel they shits themselves"
How to play a Shovel Knight
Using Shovel V, use short heavy sweeps against hordes. Use activated heavy (fold up) against single target elites. Occasionally use charged sweeps (with thrust and/or crunch) against spread-out weaker elites and brutes for stagger and finishing blows. One method is a quick wide sweep followed by a fully charged sweep to kill multiple at once. Against bosses, acquire aggro then do thrust-charged folded attacks. Rumbler is my ranged of choice as a panic button if surrounded by armor, as the shovel is weak to mixed hordes. You can easily use another blitz for that same purpose though.
Thrust + Brutal Momentum + Crunch + Carapace perk allows the Shovel special to 1-shot a crusher or multiple maulers/human-sized enemies at once without needing Heavy Hitter.
Activated lights can sometimes 1-shot muties.
The activated light attack is still useful against unarmored high HP enemies because it has a much shorter recovery time after being used. Very nice for waves of muties or quickly taking out a light elite.
Shovel XIX vs V
XIX has strikedown heavies that are slightly faster, deal more damage and swing almost straight down, so you'll kill Specials and Elites more easily without having to activate your special. Unfortunately, you'll be weaker in a horde and will have to rely on your ranged weapon and push attacks.
V has relentless unactivated heavies that cleave horizontally in a perfectly straight line, potentially killing a whole slew of trash. Regular heavies are enough for basic enemies, but you'll generally want to charge the heavies fully when against Brutes or when Elites are mixed into a horde. If you choose to use Slam instead of Soften Them Up, fully charged heavies will reliably stagger multiple dreg ragers. If you're not running Slam, it's situational whether you should do wide heavies or take them out one at a time with folded attacks.
The activated Heavy is effectively identical for both shovels.
If you want an alternate weapon, Branx Pickaxe is fine on this build as well.
Shovel V Stats and Blessings
Stat priority:
Dump stat Defenses
First Target has insane synergy with Brutal Momentum because if the first target dies, the second target also benefits from the First Target bonus, and so on until 4 enemies are dead. 80% First target is 1.15x damage, 60% first target is only 1.05x damage (9.5% difference).
Penetration determines carapace and flak armor penetration (nothing else). 80% stat equates to ~60.9% damage against armor. 57% stat equates to ~53.3% damage against armor (14% difference)
Damage is the base damage. It's still important because everything multiplies off it, but the scaling for this variable isn't wide. 80% stat is 165 base heavy damage. 60% stat is 155 (6.5% damage difference).
Defenses affects your sprinting stamina consumption, dodge distance, and push cost. Really bad Defenses will even have a lower dodge limit. Because you're so slow already, with a defenses stat below 50% you'll be out of stamina a lot which makes it hard to block and push when you need to. Even though you're not using a shield, it's fine to just block against ragers sometimes while you wait for a window to attack.
Crowd Control: affects stagger duration and amount, as well as cleave damage. Even with a 50% Crowd Control stat you'll cleave through an entire crowd with brutal momentum. The biggest place it matters is when swinging at spread out elites and especially ragers. Test your shovel with and without Slam to see if you stagger ragers.
Perks: Carapace is good for most Shovels and lets you get the 1-shot reliably. Flak, Maniac, and Unyielding are all good for the second slot but none are necessary for the weapon to work well. Without +Flak, Bruisers will be a slight annoyance, but most will die to either the bleed or a second hit, depending on your weapon's stats, and you can always take the extra second to do a charged hit. Even with +Flak you won't 1-shot bruisers unless you got a lot of enemies with your last heavy attack anyway. +Maniacs is strong. It can let you 2-shot Dreg Ragers with unactivated Crunch heavies without HH stacks, so if you do roll with Maniac on one I recommend using Rock and Slam. It also lets you kill muties with a light special instead of a heavy one. Unyielding only really matters against bosses but it makes big number feel good.
Thrust (IV): necessary to make good use of the shovel's special. It's non-negotiable on the weapon right now.
Brutal Momentum (I-IV): This is what lets you dome multiple non-ogryn elites in a single swing and gives it great horde clear despite its slow speed. The 15% weakspot damage bonus at max is actually a lot less than it seems. It only increases the difference between base damage and weakspot damage, and the difference on this weapon isn't particualrly high so instead of doing 15% more damage, you're doing like 1% more damage. This blessing also makes the crowd control stat less important.
Ranged Options (in order)
The biggest weakness of the Shovel is that while it's great against Armor or a horde, it's not particularly good when you have both at the same time or the threats are spread out. One answer to this is frag bomb, but without enhanced blitz it's not always an option and without rocks you need a weapon that can handle range. Your ranged weapon should compensate for this somehow.
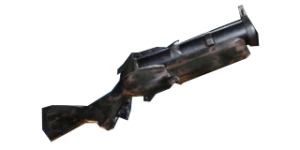
Rumbler: Great option if you want a panic mode. 1 grenade can disrupt a pack of enemies so you can sweep up or save a teammate from afar. Mostly held back by low ammo supply and its inconsistency. If its ammo supply is buffed it'll be a good choice. Its main use in this build is spam when completely surrounded so go with Blaze Away and Blast Zone.
Kickback is still very strong and will help you protect your teammates, but you will want Rock for distant bombers. Weapon special counts as heavy melee. Blaze Away is the best blessing and the buffs apply to the shot that makes it so even if you don't chain hipfire shots it's still an 8% power buff, but if you chain hipfire it gets quite powerful. I like to combo it with Inspiring Barrage here to refill toughness while chaining shots and will help you stay alive and make an escape path when surrounded. Run and Gun is nice for an extra power buff and the better accuracy at short and medium range, but it's also a drawback at long range due to hitting fewer enemies and thus dealing less total damage due to minimum pellet count mechanics. You also have to remember to tap sprint right before every shot as you can't reload while sprinting (blaze away can still be maintained while doing this). Expansive is also useful, but it's annoying to maintain the buff as kickback is slow to switch to and reload so it's hard to make good use of it.
Grenadier Gauntlet: basically a reloadable rock, as long as you have Pinpointing Target and +Maniacs on it. I recommend Gauntlet if you want to run this build with Nuke or Box of Hurt. The weapon special is a pretty useful (but buggy) panic button as it has much higher explosion radius and will knock down and damage enemies all around you. Melee damage is dump stat. For the second blessing, Glory Hunter is my personal pick and can restore toughness in a pinch when harassed by many gunners. The special attack is especially effective against scab rager packs and mixed hordes, and counts as a heavy attack (super useful if using Heavy Hitter). Combining all that can let a single special 1-shot multiple scab ragers. Explosive Offensive is also usable if you really like using the special attack several times in a row.
Single Shot Stubber is a great grenade gauntlet alternative.
Stubber: Good if you take rock. Long Gorgonum equip time to equip makes it unusable for surprise specialists and Achylys accuracy is rough, but they're great at clearing non-carapace elites within a horde. Gorgonum is the stubber of choice for any build that doesn't use Point Blank Barrage. Lucky Bullet is usable with this build.
Ripper: a great all-around weapon, but it doesn't synergize well with Shovel V's weaknesses. It won't do much in a panic situation where there's both armor and a horde at the same time.
Stims
Concentation: Always pick it up if you see it. Taunt will save the team in a pinch. Wall shield psykers and Chastise Zealots may need it more though.
Med: always good. Use it to save lilun, or hand it to lilun so you can get Concentation.
Damage: mostly only useful for you against bosses or in a mixed horde.
Celerity: basically worthless for your melee. Increases speed of horizontal heavies by less than 10% and doesn't increase speed of fully charged heavies significantly at all. Use on a teammate or when spamming ranged attacks.
Loyal Protector
Your weapon has great cleave and your special can kill multiple enemies if they're grouped. LP helps group enemies and gives a very useful stagger at the right time.
Just Getting Started (cooldown reduction on stagger) and Valuable Distraction (enemies take +25% damage) are both useful but it's harder to proc JGS in this build because it only activates when you stagger an enemy but don't kill them and only once per attack. The point of this build is killing what you hit so it won't proc often.
Keystones
I recommend trying both Heavy Hitter and Feel No Pain to see which you prefer.
Feel No Pain is a very slight reduction in offensive power for this build but you can still hit most of the important breakpoints most of the time.
- It claims to give damage reduction, but it's actually only toughness damage reduction and stacks multiplicatively with other sources of damage reduction and even with itself (so at max stacks you're not getting 25% DR, but 22.5% TDR).
- Shooters drain your stacks super fast
- Pushing to restore stacks isn't worth your time
Lucky Bullet (BLO) is usable in this setup too, but ideally not with rumbler.