
Table of Contents

Class

Weapons


Blazing Spirit
Enemy gains 4 Stack(s) of Soulblaze on Critical Hit, to a maximum of 12 Stack(s).
Uncanny Strike
Hitting an enemy's weakspot applies 8 stacks of 2.5% Brittleness. Duration 5 seconds. 16 max stacks.

Raking Fire
+40% Damage when shooting Enemies in the back.
Dumdum
+6% Close Range damage on Repeated Hit. Stacks 5 times.
Curios

+1-3 Max Stamina
+13-17% Toughness
+17-21% Max Health
Talent Tree
Description
General
This is a melee-focused Psyker build. The psyker doesn't get many melee buffs so we have to make do with the proper gear, skill and fitting talent choices.
It provides lots of damage with a good amount of defensive options and mobility built in. It is highly gear and skill-dependent. We have a base value of 15% Crit Chance which can be buffed up to 35% with Scrier's Gaze. Soulblaze effects are used to deal with hordes by either critting with the Deimos Sword or killing Specials & Elites. Wildfire spreads the soulblaze to other enemies.
The Deimos Sword is the main weapon. You will need to have a good understanding of positioning, map awareness and proper melee skills (dodging, blocking, when to attack, when to use which attack etc.)
The sword can easily kill most enemies with its different attacks and heavily stagger maulers and crushers to buy time. With enough rending stacks killing maulers and crushers is a matter of ~2-3 heavy weak spot hits.
The Kantrael Lasgun is mainly used for quickly dispatching ranged specials/elites and keeping your disrupt destiny stacks up while staying mobile.
Brain Rupture is used for its passive procs to buff your damage against armored enemies and bosses.
This build relies on a heavy investment into dodge and weak spot hitting for both survival and damage efficiency. Thus appropriate application of these techniques is paramount for the build's success. I found it entertaining to make bettering my use of these skills as a goal for playing. If you do too, this build is for you.
I'm currently running it on auric damnation and have used it to kill the twins on damnation hard mode.
Deimos Mk IV Blaze Force Sword
Target Stats: 80% Damage | 80% Mobility | 60% Warp Resistance | 80% Finesse | 80% First Target
+25% Damage against Maniacs: Extra damage against most specials & disablers and more importantly ragers. You're going into melee so you will have to deal with them. The faster you kill them the better. However, you need to have proper footwork. A good mix of dodging and blocking is essential.
+25% Damage against Flak: Many enemies utilize Flak Armor one way or another. Be it Maulers, Assassination Bosses (including the Twins) or scabs - you will need it.
Perk Alternatives: Replace extra damage against maniacs for extra carapace damage. Helps you deal with maulers and crushers even more. Most specials & disablers die in one hit to their weak spot (head, most likely) without the extra 25% dmg anyway. As long as you hit the first attack from the light attack chain.
Extra damage against unyielding might also be worth it if you want to deal more damage to bosses. Again, replace damage against maniacs, not flak. Flak damage is too important in my opinion.
Blessing - Blazing Spirit: One of the Deimos' weaknesses is dealing with large groups of enemies. Soulblaze fire is our main way of mitigating that. It synergizes well with the talents Perilous Combustion, Wildfire, the increased crit chance from Prescience, the minor critical chance boost node and the increased crit chance from Scrier's Gaze.
Blessing - Uncanny Strike: Our main melee tool to deal with armored enemies. Hitting a weak spot gives you 24% rending for 3.5 seconds. Stacks up to 5 times, so 120% rending in total. You'll deal some heavy damage to maulers and crushers.
Blessing Alternatives: Personally, I don't think any other blessings work well with a melee build like this. Executor increases your power level per repeated weak spot hit. Repeated in this instance means that if you don't hit a weak spot you will lose all stacks. Shred increases crit chance for chained hits. Chained means you'll lose all stacks if you don't hit anything. This is bad news in several ways, especially when it comes to the second attack from the heavy attack chain which is extremely important. (I'll elaborate on this attack in the following paragraphs). Exorcist might be worth it if you want to extend Scrier's Gaze's duration. But in my opinion, you can activate it frequently enough as is.
Why the Deimos: Not only is it a very mobile weapon (up to 5 dodges, +12.5% dodge range, +7.5% dodge speed, +0.45 sprint speed), but it packs a serious punch. It has two key attacks that you need to master: The "Puny Pin-Point Pieks" and the "Powerful Pin-Point Pieks" as I like to call them. "Pieks" is German and means "prick" or "jab". It's pronounced like the word "peeks" (as in "he peeks around the corner") to make the alliteration work.
Puny Pin-Point Pieks: The first attack of the light attack chain. It is a 100% accurate jab. Bombers, (Tox) Flamers, Dogs, Snipers, Scab Shotgunners & Scab Gunners as well as poxwalkers of any kind will die with one weak spot hit. This is without any buffs from Disrupt Destiny, Scrier's Gaze, your team or rending stacks.
Powerful Pin-Point Pieks: The second attack of the heavy attack chain. The easiest way to trigger this is to make one light attack - the Puny Pin-Point Pieks - and then switch over to a heavy attack. This will kill trappers in one weak spot hit. Mutants, Dreg Gunners & Shotgunners can be killed in one weak spot hit once you have some buffs from Disrupt Destiny or Scrier's Gaze.
More important, however, is its ability to stagger crushers, maulers and even the twins. If you hit either of them at their weak spot (head), you will stagger and throw them to the ground.
Special Action - Force Sword Charge/Attack: I barely use it. It locks you in place and doesn't deal that much extra damage compared to the "Pieks" attacks. However, if you hit a crusher or mauler with this on their weak spot it will give you 4 rending stacks once it's finished. So not entirely useless, but use it with caution because of the animation lock.
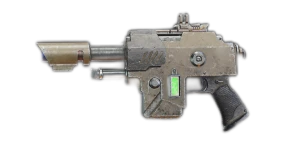
Kantrael Mk X Heavy Laspistol
Target Stats: 80% Damage | 80% Mobility | 80% Stability | 80% Ammo | 60% Stopping Power
Perks: Same as for the Deimos. Helps you deal with flak, specials & disablers as well as ragers. But from afar.
Blessing - Raking Fire: Extra damage when shooting enemies in the back. You don't have stealth like zealots or veterans, but the opportunity presents itself more than enough to make this worth it.
Blessing - Dumdum: Up to 30% extra close-range damage on repeated hits. Since this weapon isn't the most accurate you will be using it mostly in close- to medium-range scenarios. Definitely worth it.
Blessing Alternatives: The only blessing I find useful other than the two is Ghost. Ranged immunity on weak spot hit for 1.2 seconds. Since the laspistol is also highly mobile (even more so than the Deimos, though it only has 4 dodges) it can be used to get in close to ranged enemies without taking hits. As long as you hit weak spots, of course.
Why the Kantrael Laspistol: Compared to its Accatran counterpart I felt it's a lot more ammo efficient while dealing acceptable damage. Its mobility is very useful for a melee-focused Psyker build. It is very accurate when hip firing - you barely need to aim down sights, which is a big plus.
Along with Scrier's Gaze and/or Disrupt Destiny stacks, you can easily kill elites and specials in a few hits. Depending on your buffs and accuracy a headshot is enough for many of them. Even maulers (unless you have extra carapace damage shoot their body - their heads are carapace armored) die in a few hits.
The main role of the Laspistol, however, is to hit enemies marked by disrupt destiny. When playing with disrupt destiny your main goal is to keep up as many stacks as possible. While killing an enemy grants you more stacks (up to your cap), hitting an enemy will reset the cooldown of your current stacks. Or in other words: Hitting a marked enemy extends the duration of the stacks you already have. This is essential if you want to stay buffed for as long as possible.
Ranged Weapon Alternative: Zarona Mk IIa Quickdraw Stub Revolver. Packs a lot more punch against armor of all kind and can penetrate up to 5 enemies. You'll probably have a harder time to maintain disrupt destiny stacks. It also eats a lot of ammo, so make sure you have a veteran with ammo regeneration aura nearby. I'd suggest 10% Ranged Critical Hit Damage, 25% Carapace Damage for perks and Surgical + Hand-Cannon as your blessings, should you go with this weapon. Max all stats to 80% except for mobility with 60% as it is your dump stat. Reloading in time can also become a major challenge.
Staves of any kind, while not consuming ammo, generate peril. We try to avoid peril generation so peril is available for blocking and Scrier's Gaze.
Curios
I like to keep things balanced. With this setup, you'll be at 106 toughness and 220 hp. The extra stamina helps with mobility, blocking and shoving. Damage resistance against gunners is extremely valuable and enables you to rush head-first into (shot)gunner groups to bind them in melee combat. Paired with proper dodging, sliding and using terrain to your advantage you can avoid taking damage entirely.
The 90% toughness regeneration speed shortens the delay until regeneration kicks in and speeds the regeneration rate up quite a bit. However, this only works for toughness regeneration provided by coherency. This is a personal preference of mine so feel free to experiment.
Toughness in general is tricky. You don't want too little because the tiniest hit will break through and deal HP damage. Too much and you take too long to regenerate. Remember: you can only avoid taking HP damage on hit when your toughness is full and the damage you take doesn't exceed your maximum toughness.
Having more HP is also very helpful in dealing with corruption.
I don't like wound curios. They only kick in once shit has hit the fan already (a.k.a. you're downed) and once that happens, especially on difficulties like auric damnation, you're often more likely to die entirely. Having more HP/Toughness/Stamina prevents getting downed in the first place.
HP Stims are also way more effective with fewer wounds: They restore up to 25% HP and corruption or 1 wound, whichever is higher. With only 2 wounds total that means if you have 50% HP and 50% Corruption (a.k.a you were downed once and picked up again), using an HP stim will heal you back to full and clear all corruption.
Talents
Mettle: Extra toughness regeneration and movement speed on crit. We crit a lot with this build.
Quietude: You might wonder why this is here since we only generate peril via Scrier's Gaze. But that's enough. You'll most likely use Scrier's Gaze when charging into a horde, groups of gunners or dealing with lots of Maulers & Crushers. While active Scrier's Gaze will grant you toughness damage reduction. Once it stops at 100% peril you're left without this extra defense. Instead, Quietude kicks in. Your peril will slowly decrease and in turn, replenish your toughness. So it'll buff your defense when your mad murder spree is over.
You can also actively quell your peril to speed up the toughness regeneration.
Perilous Combustion: We need all the extra AoE damage we can get since neither the Deimos, the Laspistol nor the Brainburst provide any. Synergizes with the Deimos Soulblaze Blessing and Wildfire.
Brain Rupture & Kinetic Flayer: We use brain rupture mainly for the passive effect of kinetic flayer to buff our damage and grant random damage spikes. Especially useful against bosses, crushers and maulers. Brain Rupture is also the ranged fallback option should you run out of ammo and need to deal with a pesky far-away enemy. Sometimes going or getting into melee range is either not feasible or entirely stupid from a tactical standpoint and most likely suicide in certain situations.
Wildfire: Spread the flames! We need all the AoE we can get and this is key for maximizing our soulblaze potential.
Psykinetic's Aura: Extra Scrier's Gaze cooldown on Elite Kills. What's not to love? Also, we need to move over to the right of the tree.
Prescience: 5% crit chance for the entire team. Mandatory.
Emphatic Evasion: We crit a lot. When we crit, ranged enemies can't hit us. Great tool to wreak melee havoc in gunner hordes.
Anticipation: 50% dodge duration and an extra dodge. Mandatory.
Scrier's Gaze, Warp Speed, Precognition & Endurance: The offensive, defensive and utility powerhouse of our build. In total this will grant you:
- +10% Damage flat - lingers for 10 seconds after Scrier's Gaze ends
- +20% Crit Chance - lingers for 10 seconds after Scrier's Gaze ends
- +30% Damage (1% per second & 1% for each weak spot kill) - lingers for 10 seconds after Scrier's Gaze ends
- +20% Movement Speed
- +30% Finesse Damage (Critical & Weakspot Multiplier) - lingers for 10 seconds after Scrier's Gaze ends
- +20% Toughness Damage Reduction
Swapping Precognition for Reality Anchor will reduce peril generation by 20% but you will lose out on +30% Finesse Damage and the ability to increase the normal damage buff for each weak spot kill. Since we don't intend to generate peril any other way than Scrier's Gaze this is not worth it.
Puppet Master: +50% Coherency Radius. Mandatory.
Warp Rider: Up to 20% extra damage at max peril. We don't burst with maximum peril because Scrier's Gaze ends when it hits that. So just another straight-up damage buff for our powerhouse ability. Mandatory.
Kinetic Deflection: Block with Peril. We don't generate Peril other than with Scrier's Gaze (and when it's active dodging and hitting take priority), so we can freely use this to block (and have to, to get to Disrupt Destiny).
True Aim: Guaranteed ranged critical after 5 weak spot hits. This allows us to once in a while draw the laspistol and one-shot an enemy marked by disrupt destiny or quickly take out a special at range.
Disrupt Destiny, Lingering Influence & Cruel Fortune: Our Keystone of Choice. Every second enemies within 25 meters have a chance of being marked. Only one enemy is marked at the same time. At max stacks (15) it provides:
- +15% Damage
- +30% Critical Damage
- +37.5% Weak Spot Damage
In addition, on kill it grants you:
- +10% Toughness
- +20% Movement speed for 2.5 seconds
A weak spot kill of a marked target grants a total of three stacks. In perfect conditions, you'll have maximum stacks after 5 marked kills.
While Perfectionism would grant us up to 30 instead of 15 stacks, their duration would only be 15 seconds. Unlike Warp Charges they all decay at once, which makes maintaining them rather difficult. Lingering Influence increases their duration to 30 seconds which increases the likelihood of maintaining the maximum amount of stacks a lot.
Hitting (not killing) a marked enemy resets the cooldown of your accumulated stacks. So even if you can't kill a marked enemy, make sure to at least hit them when your stacks are running low on time.
Why not: Talents
Soulstealer: Sounds great on paper. 7.5% toughness regenerated on warp attack kill. Unfortunately, with this build, we don't do too many warp attack kills. Brain Rupture, Force Sword Charge Attack and Soulblaze are our only warp attacks. That latter (soulblaze) works in horde situations. However, and this is key, Soulstealer does not grant an additional 7.5%. It just raises the 5% you get when killing any enemy however you like by 2.5% to 7.5% on warp attack kill. Definitely not worth it in this build.
Warp Expenditure: 25% Toughness regenerated for 100% peril generated. Not worth it. We're tanky enough as is when Scrier's Gaze is active.
Perfect Timing: As with Soulstealer, we don't deal enough warp damage to make it worth it, even though our crit chance is high enough to get stacks fairly quickly.
Battle Meditation: Would only be useful to extend Scrier's Gaze, which is readily available more often than not already.
Smite: Can't crit, can't hit weak spots. Great crowd control but not the focus of this build.
Assail: Good ranged option. Unlike Brain Rupture it can't deal with bosses, maulers and crushers. It also generates too much peril which shifts Talent priorities. Doesn't quite fit with the idea of this build.
Mind in Motion: We barely actively quell peril.
Malefic Momentum: While we kill a lot with non-warp attacks, we barely use any warp attacks. Not worth it. Also not accessible when using Brain Rupture.
Kinetic Presence: The damage increase is nice, but we lose out on extra crit chance and our defensive dodge talents. Also not accessible if we want Scrier's Gaze.
Seer's Presence: We don't need more cooldown reduction for Scrier's Gaze. Would also lock us out of Anticipation.
Unlucky for Some: Interesting clutch ability but neither viable nor accessible for this build.
One with the Warp: Great damage reduction tool that synergizes with Scrier's Gaze. Only availble when using Seer's Presence, though.
Venting Shriek: We don't generate a lot of peril with Scrier's Gaze to make this worth it. It's nice for a more soulblaze-focused build, however.
Telekine Shield: Great support and defensive option. But we would miss out on a lot of damage. Blocking enemies with walls is great fun. Having toughness regeneration inside the dome is awesome as well. Just doesn't fit this build in particular.
Solidity: Again, we barely actively quell peril. Not worth it.
Warp Siphon: Great Keystone. It can actually work with this melee build, however, it doesn't synergize with Scrier's Gaze as you lose all warp charges on activation. The extra cooldown reduction isn't needed. So while it works it just feels worse overall.
Empowered Psyonics: Only buffs blitz abilities that are actively used. We use Brain Rupture mostly for its passive procs.
Purloin Providence: Same as Battle Meditation. We don't need extra ways to quell peril.