Table of Contents

Class


Weapons

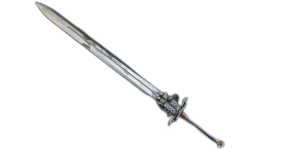


Deflector
This weapon Blocks both Melee and Ranged attacks. Additionally, Block Cost is reduced by -30%.

Unstable Power
Up to +5% Strength, scaling with Peril.

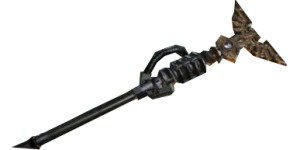

Rending Shockwave
Target receives up to 8 Stacks of 2.5% Brittleness, scaling with charge time of Secondary Attack. Debuff lasts for 5 seconds and can have a maximum of 16 stacks.

Warp Flurry
-8.5% Charge Time on Chained Secondary Attack. Stacks 3 times.
Curios


+13-17% Toughness
+13-17% Toughness
+17-21% Max Health
Talent Tree

Description
Shyish Psyker
I like to take this build specifically into Auric Maelstrom C-I-VI (Waves of Specialist Enemies. Only Scab faction. This is the kind of situation where the Equinox Mk III Trauma Force Staff shines. If you have ever played this maelstrom modifier before, then you will be aware of the butt-clenching fear that comes from seeing 9 Maulers and 5 Crushers, packed tightly together in a ball of death. This exact scenario is the best situation for the trauma staff. That packed-in ball is terrifying to most other builds, but for the trauma staff, it is free real estate. The trauma staff is able to knock all of these threats on their arses, providing greater Crowd Control in this specific situation than even smite can offer, all whilst doing significant damage.
Playstyle
Stay behind your team for most of the mission, especially if you're fortunate enough to have Ogryns or Zealots with you. Support them with your Equinox Mk III Trauma Force Staff to knock Crushers and maulers to the floor, as well as apply a hefty armour-rending debuff to them. If your team utterly fails (which happens quite frequently in pubs), you can place the blase directly underneath you. If you're backed into a corner, this can save you by knocking threats back and killing them at the same time. Your Maccabian Mk IV Duelling Sword is used to deal with individual threats. Combo a Heavy-1 attack into a quick follow-up special attack, to deal great damage whilst also stunning individual maulers and Crushers. Just make sure you aim for the head otherwise stagger will not proc, and your damage will be greatly diminished.
As the number of ranged threats is relatively low, we do not have to opt for the Telekine Dome to shield us and our teammates. There are still a lot of snipers, however, and without Deflector on a force sword, we want some form of ranged protection. Brain Rupture can take them out, but we need something to protect them as well as attack them. I instead prefer to opt for the left-hand path to gain 2 shield stacks. Enervating Threshold can be used to protect against snipers, as well as block specials in their tracks. Flamers and trappers in particular can be serious threats which reduce your room to move, and this can help deal with them. See a mutant running at you? Pop down a shield, watch it slam into it, and then poke it to death with your melee. Running this set-up also has great synergy with Kinetic Resonance. When a boss appears, drop a shield and start spamming Brain Rupture on it. When you hit 100% peril, quell, drop your second shield, and start doing it all over again. In short, we have the tools to deal with every threat from a safe distance.
Build Path
I normally like to pick up all three toughness replenishment nodes, but here we need to save the points. I drop the least impactful in Warp Expenditure and pick up Soulstealer & Quietude. Perilous Combustion gains more value the higher the difficulty and intensity. On auric Maelstroms, and especially on C-I-VI missions, there will be plenty of elites to proc soul-blaze with. Whilst Crushers do not take significant damage from Soulblaze, Maulers and any other chaff around them will, so can be used to help burn through the weaker enemies. Brain Rupture provides us with a long-range tool, useful for taking out snipers and other specialist enemies. Ordinarily, Kinetic Flayer has a nasty habit of proccing on low-tier enemies like Poxwalkers. On these types of missions, however, with the high amount of elite units that tend to cluster together can hit an elite with a high degree of certainty and start the soul-blaze truck rolling. Kinetic Resonance is our long-range nuke. As we will be going down the Warop Siphon route to gain extra cooldown reduction, paired with an ability with 2 charges already, we have access to rapid-fire, long-range Brain Bursts pretty much on demand.
Pskinetic's Aura is one of the best nodes in the game, thanks to its ability to affect you and your allies. The fact that it works on either Elites or Specials is frankly overkill, and makes it far superior to similar cooldown reduction abilities on other classes. We move over to the right so that we can pick up Prescience & Empathetic Evasion. I know some might be screaming right now for not picking up Seer's Presence, but we really do not need more cooldown reduction, and we are already helping our team out with Pskinetic's Aura. The combination of Prescience & Empathetic Evasion allows us to proc our melee ability Riposte on a critical hit as well as a dodge. By increasing our critical chance by 10% (taking into account the node further down the tree), and by hitting enemies with a 1-2 combo of Heavy-1, Special-1 in quick succession, we increase the likelihood of starting a critical hit, and being able to continue our crit chain with a positive feedback loop.
Telekine Shield provides protection from ranged opponents. Whilst this modifier is mostly melee enemies, that does not take into account specialists. Expect an above-average amount of flamers, trappers and snipers coming your way. To help deal with specialist threats, we take the less common option of going left, grabbing Enervating Threshold & Bolstered Shield. This can be used not only to stop bullets, but also to stun specialist enemies in their tracks. Mutants, flamers, trappers and dogs (although admittedly it seems a bit buggy with poxhounds), will get stunned. Mutants will crash into them like a wall, and other enemies will be knocked to the floor. Use this to deal with these annoying threats whilst you're tending to the large group or crushers. It also provides two uses of your ability, which synergises amazingly with Kinetic Resonance, allowing you to have access to it almost on demand.
Kinetic Deflection is an ability I honestly struggle to go without anymore, and perhaps that's because I overcommit too often and find myself surrounded. Regardless, if you find yourself in a bad situation, you can block an absurd number of attacks, whilst dodge-sliding back to your team. Crucially, it also makes it much easier to resurrect your teammates even if they are surrounded by a horde. Warp Rider, similiarily, is a node I seldom go without. Having up to 20% extra damage on ALL your attacks based on your peril, is an ability that fits into basically every Psyker build. Puppet Master is kind of mediocre, and more of a tax node. It may help increase coherency and make sure your allies are benefitting from Pskinetic's Aura, but you should be trying to avoid splitting up too much from your team most of the time, so rarely plays much of a role. Solidity on the other hand, provides a great boon, allowing you to quell faster. That time saved can mean the difference between knocking a crusher on its backside, or that crusher knocking you to the floor.
Warp Siphon provides cooldown reduction whenever you use your ability. We don't really take it for this effect, but it does mean that it's possible to use our ability 3 times in quick succession. When using Kinetic Resonance, this is more than enough to kill any monstrosity from a safe distance, even if our team is not able to attack it at all. No, the real reason we go down this route is to pick up all the buffs to our staff and warp attacks. Warp Battery allows us to stack up to 6 times.
Inner Tranquility x6 + peril resistance node: 0.64×0.95=0.608. 1-0.608 = - 39.2% Warp generation.
or in other words, we will only be generating 60.8% peril from what we normally would.
Empryean Empowerment x6 = +24% Warp Damage.
So we deal more damage with our staff (and Brain rupture) whilst generating less peril, allowing us to string more attacks in quick succession, all of which deal more damage. With Psychic Vampire, we don't even need to rely on Elite or Specialist kills (of which there are already plenty), and will gain a charge for every 20 enemies killed on average, regardless of what enemies they are. You can even be super fortunate and gain two charges for killing an elite. One because it's an elite, and a second because it procs the 4% chance. Even making use of of ability to proc Kinetic Resonance, it really does not take long to stack your Warp Siphon charged back to full.
Weapons
The Maccabian Mk IV Duelling Sword is arguably Psykers best weapon in terms of pure offence. Heavy attacks have great penetration, only losing a small amount of damage to the carapace, and almost no damage to flak. In a mission type where we are expecting to face A LOT of flak and carapace armour, it is the perfect melee weapon. The special attack does little damage, but has a very high stagger, and can combo swiftly off of a heavy attack, allowing you to go for 1-2 combos. Heavy-1 into a special attack will stunlock most enemies (provided you are hitting them in the head), before poking them to death. The straight lunge makes it easy to line up and hit weakspots for heavy damage. We grab two blessings which both benefit from Empathic Evasion, Riposte and Precognition. Riposte lets you generate a feedback loop, where critical hits now count as dodges, further increasing the likelihood of more critical hits and thus, more activation of our blessings. Precognition further benefits with a frankly absurd +60% damage on headshots when it does proc, allowing you to melt through carapace as easily as any other foe. We take extra damage to carapace, as crushers are covered head to toe in it, and maulers have carapace on their head, and is the only place you should be aiming. For secondary damage, I pick up a maniac. Provided you have a decently high enough damage stat, this will allow you to 1-shot Maniacs on headshots.
The Equinox Mk III Trauma Force Staff provides both Areas of effect damage and areas of effect staggers that are all rolled into one. See that pack of 8 Crushers? They are kind of scary, aren't they? Not so much when they are knocked on their arse and floundering to get back to their feet. Some people like to run Blazing Spirit paired with Warp Nexus, to spread Soulblaze on critical hits. I am personally not the biggest fan of it (At least not in C-VI-I runs). Not only is its application inconsistent, but soul-blaze does very little damage to Crushers, which are the primary threats we are attacking. Instead, I like to grab Rending Shockwave. This provides up to 40% Rending on their armour. Not only will this proc consistently (unlike Soulblaze) meaning that subsequent hits deal more damage, but it also debuffs the enemy for your teammates, making It the far superior option. We slap on Warp Flurry to increase our charge time on subsequent attacks, allowing us to quickly make use of the already rebuffed enemy. We pick up Carapce to deal with Crushers. For secondary, we pick up extra damage to Flak. Maulers are covered in Flak armour from the neck down, so unlike with our melee weapon, we are unlikely to be hitting them in the head.
Curios
- 2 x toughness curio
- 1 x health curio
- 3x ability cooldown
- 3x revive speed
- 2x gunner resistance
- 1x toughness perk
Whilst you can make adjustments based on individual builds, I find this to be a pretty good mix of stats for most psyker builds, and is a good starting point to aim for, as I know how tedious it can be to find those +17 toughness and +21 health curios. Block efficiency and stamina regeneration can also be useful depending on what you are looking for, and you can adjust your loadout to what you need. In general, if you are looking for more toughness or health, it is more efficient to pick up toughness perks and a health curio, as a curio gives you +21% health compared to +17% toughness, whereas both versions of the perk only give +5% health.
Whilst the psykers innate health is low, and at high Havoc we will still get 1-shot by crushers and maulers, I have found the extra health useful in mitigating the myriad forms of corruption present. Cooldown reduction lets use our abilities more frequently. Abilities are some of the most powerful tools any budding varlet has, and should be prioritised in the majority of cases. Whilst everyone should be working hard to avoid dying, there will inevitability be times when we need to make a quick pick-up. Kinetic Deflection makes this possible, provided there are no heavy hitters in the mix, and extra revive speed can help make the difference to losing a teamate or not.
Gunner Resistance is the most useful resistance node as it applies to Dreg Gunner, Dreg Shotgunner, Scab Gunner, Scab Plasma Gunner, Scab Shotgunner, and Reaper. Please note, this reduction does not apply to basic gunner type enemies, and these previously unassuming enemies will become some of the biggest threats in high havoc. This is the largest collection of enemies out of any of the resistance perks. These enemies can absolutely shred you in seconds, and it's not uncommon to see teammates seemingly insta-die when faced with a firing squad of them, especially with toughness grace period being removed. The ability is multiplicative, so it does have some diminishing returns. 0.80×0.80×0.80=0.512
3x Gunner resistance = 48.8% damage reduction
2x Gunner resistance = 36% damage reduction
It's up to you whether you choose to take all 3, or use that last slot as a flex pick. I personally like to pick up block efficiency because of its synergy with Kinetic Deflection. Since Kinetic Deflection converts a blocked attack's Stamina cost into Peril at a fixed rate, anything that lowers the underlying Stamina cost of a block also lowers the Peril you take on for absorbing it.
Peril gained = Blocked attack's Stamina cost × 0.25
Extra block efficiency therefore compounds twice over: you're spending less Stamina per block in the rare cases you do dip into it, and you're generating less Peril from every block that Kinetic Deflection converts.
Strengths
The Shyish Psyker build is ideal for Auric Maelstrom C-I-VI missions, leveraging the Equinox Mk III Trauma Force Staff's superior crowd control and damage against groups of elite enemies like Maulers and Crushers. By staying behind your team and using the trauma staff to knock down and debuff these foes, you provide unparalleled support. The Maccabian Mk IV Duelling Sword complements this by handling individual threats through precise, head-targeted combos. Ranged threats are managed with the Enervating Threshold ability and shield stacks, allowing you to protect against snipers and specialists while synergizing with Kinetic Resonance for effective boss damage. This build offers a versatile and powerful approach to handling elite enemies and large groups, ensuring reliable performance in these challenging missions.
Weaknesses
This is a specialist build, designed for Auric Maelstrom C-I-VI missions. As such, it will not fare well into several other maelstroms. Whilst we can deal with some ranged enemies, the lack of Telekine Dome, and limited long-ranged options means it will struggle against massed ranged enemies. Assail or another staff like the Equinox Mk IV Voidstrike Force Staff, or even a gun would be better suited to these situations. Whilst we can deflect near limitless lesser enemies, Kinetic Deflection will not help us with Crusher or Mauler overheads. Given how squishy psykers are, it is unlikely that you would be able to survive a single hit from either of these attacks. They are easily avoided when it is just one foe you are facing, less so when there are dozens.
Questions & Answers
Question: Why do the stats/weapons/abilities in the video posted not reflect what is written in this guide?
Answer: I am constantly changing, updating and working on my builds. As patch notes come, certain weapons and abilities become more or less powerful. As my skill and knowledge increase (hopefully) and what I think is the best version of a build changes. I try to make sure there is always a video showing me completing a damnation level, Auric run as proof of concept to all my builds. Sometimes they will be outdated. I try to keep everything I do updated, but Darktide is my hobby, and I'm not always able to keep everything up to date. What I put in these guides is the most up-to-date version of my current mindset, and should be taken over whatever is posted in my videos.
Video


Other builds by Crukih