Table of Contents
Ogryn Build - Warhammer 40k: Darktide
Slave-Ogryn - High Damage/Elite & Horde Clear/Tank
Ogryn Build - Warhammer 40k: Darktide
Class

Weapons


Slow and Steady
Recover +8% toughness when hitting an enemy with a heavy attack, based on charge time.
Thrust
Up to +20% Strength based on the charge time of your heavy attacks. Stacks 3 times.

Surgical
+10% Critical Chance for every 0.2 second while aiming. Stacks 10 times. Discharges all stacks upon firing.
Run 'n' Gun
You can Hipfire with this weapon while Sprinting. +15% Close Damage while Sprinting. Also reduces weapon spread at all times by -30%.
Curios

+13-17% Toughness
+13-17% Toughness
+13-17% Toughness
Talent Tree
Description
If you need a Horde-Clearing and Elite-killing monster, the Slave-Ogryn is about as strong as they come. With a massive two-handed weapon and ample Toughness Regeneration, you'll be able to stay in the fight and keep swinging well after everyone else has backed off.
Weapons
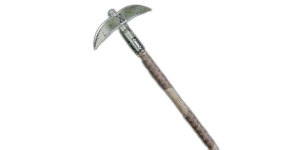
Delver's Pickaxe - Your bread and butter, the weapon that will clear Hordes and kill Crushers with equal ease. As long as you keep swinging, you can remain engaged in combat indefinitely. The Karsolas MK II has the best Horde-Clearing potential, and its Special > Heavy Attack combo can quickly kill tougher foes.
Perks
- Carapace Damage - Allows even the clumsiest strikes to two-shot a Crusher.
- Elite Damage - Pile on a little extra damage to all Elites, allowing you to reliably hit two-shot breakpoints.
Blessings
- Slow and Steady - Paired with The Best Defence and Smash 'Em!, you will instantly heal any Toughness damage you take while charging Heavy Attacks, regardless of how many enemies there are. Slaughterer is a good alternative if you want to trade survivability for damage.
- Thrust - Will average a 40-60% Damage increase per swing with this weapon, allowing more consistent breakpoints than Headtaker or Slaughterer. With Thrust, you should be hitting your one- or two-shot breakpoints on enemies every time.
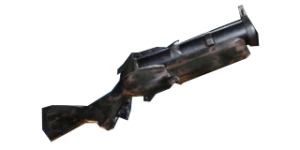
Kickback - You won't often need ranged weapons, but when you do, the Kickback will have you covered, as it is able to one-shot Specialists such as Snipers, Trappers, and entire packs of Pox Hounds even with poor accuracy and through large groups of enemies. For long-distance Specialist sniping, good alternative weapons include the Rumbler and Heavy Stubber.
Perks
- Reload Speed - More bullets, faster, whenever you need them.
- Unarmoured Damage - Helps with Sniper breakpoints at longer ranges.
Blessings
- Surgical - The high Crit Chance afforded by Surgical will massively increase your ability to one-shot Specialists at range.
- Run 'n' Gun - A 30% Reduced Spread modifier increases accuracy significantly, meaning more pellets will be on-target. The ability to shoot Specialists while sprinting is just an added bonus.
The Slave-Ogryn is designed to push into big groups of enemies and keep swinging with Heavy Attacks until there's none left. Toughness Regen from Slow and Steady, The Best Defence, Smash 'Em!, and Unstoppable synergize with Damage Reduction from Implacable, Batter, and Delight in Destruction to allow you to keep swinging without needing to block, and Payback Time rewards you for using Heavy Attacks instead of Blocking. With max-rating Curios, you will have roughly 175 Toughness to protect you during your swings.
Only Crushers, distant Ranged enemies, and Disablers are likely to cause you any issue. For these, your Kickback, the Delver's Pickaxe's Special combo, and the Big Friendly Rock will be your most reliable weapons. The Kickback and Big Friendly Rock can easily kill Disablers, Gunners, and Snipers from afar, and the Big Friendly Rock will instantly kill Mutants. Your Pickaxe's Special > Heavy Attack combo can kill Crushers and Maulers consistently, so you will be able to frontline these enemies for your team.
As a powerful frontliner, your job will be to clear both Hordes and Elites before they can threaten your Teammates. Try not to sprint ahead, as while it may help you recover Toughness faster, you will leave your team vulnerable in the process. Turning around and checking for other enemies near the team is often the better choice, as you will recover the same amount of Toughness with even a single target thanks to Smash Em!. Indomitable allows you to run through Hordes to return to and protect your team when necessary, and Trample gives another boost to Damage when Payback Time isn't active. Alternatively, taking Pulverise can provide you with more survivability if needed.
As long as you keep on swinging, the Slave-Ogryn will be the backbone of any team, holding off entire Hordes with impunity and breaking through even the toughest enemies.
Note: While it is tempting to boost your Damage with Crunch!, it is worth noting that Crunch! only gives its bonus at the end of a full charge; in this time, you could instead release two attacks with two Stacks each of Thrust for double damage.