Table of Contents
Ogryn Build - Warhammer 40k: Darktide
Pub Ogryn
Ogryn Build - Warhammer 40k: Darktide
Class

Weapons


Momentum
Hitting at least 3 enemies with an attack, restores +15% toughness.
Confident Strike
+8% toughness on Chained Hit.

Charmed Reload
5 bullets loaded from Reserve on Critical Hit.
Curios

+17-21% Max Health
+17-21% Max Health
+17-21% Max Health
Talent Tree
Description
This is the most comfortable build I go with on solo public damnation matches. Just my 2c from playing a bunch of public games solo with this build. My goal is to be able to solve any problem heretics will throw at you without necessarily having to rely on teammates, while trying to maximize your teammates effectiveness so you don't necessarily need to.
Weapons:
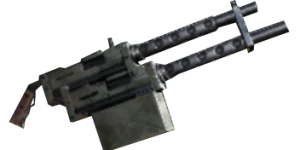
The Heavy Bolter lets you strongly contribute even in rooms that are full of shooters, minimizing damage to your team and time taken clearing these. You can use it to suppress multiple gunners and shotgunners simultaneously. It may take a couple bursts to kill a distant sniper but it'll get the job done if you can dodge their shots. And you can basically mow down incoming elites outside of crushers. It does come with some weaknesses however. If we want to be able to solve any problems, we will need to take a melee weapon that can deal with carapace. It's biggest problem is the time it takes to get it out and reload. You can start getting ready to shoot it while sliding, but not while jumping. Sliding while taking out the gun and dodging to move while you have it out will provide you with a bit of mobility. Another trick to pull it out is to walk up to incoming melee mobs, and dodge back at the last moment - getting as close as possible synchronizes more of the enemy attack animations, rather than having them attack all at different times preventing a single dodge from being effective. It comes with a big enough clip that it's often worth it to shoot enemies that make it into melee range rather than taking out your club just for a few of them. One last plus: the large ammo pool on this weapon makes it a very safe pick if you're not going to have a veteran on the team compared to the rumbler or grenade gauntlet.
The Bully Club is the highest damage anti-crusher weapon you can take that's currently on here. With the Bully club you'll want to use a light 1 → heavy 2 combo interspersed with pushes against hordes. Focus down single enemies with heavy 1 → light 2 → light 3. The 3rd light attack an excellent damage profile compared to the other two and comes out quickly. A notable exception is vs unyielding enemies, where the heavy 2 does completely ludicrous amounts of damage and you should definitely combo into it. The push attack combos into light 3, which can be a quick and safe way to deal with scabs and dregs, but will leave you wanting more cleave against hordes. This weapon has great stagger but terrible cleave vs hordes in general, and you may want to whip out your heavy stubber if you need to kill a lot quickly.
The Power Maul is a great alternative that might be even stronger. You can initiate a slide after you begin the weapon special animation, enabling you to use the special attack even against relatively weak enemies without loss of mobility. Generally vs hordes you'll want to push attack → heavy attacks (both 1 and 2 are similar), and you'll be able to stagger lock even large numbers of enemies. The push attack also combos into light 3, enabling you to spam the anti-horde light attacks immediately in situations where you don't feel you have time to spin up a heavy attack. The nice thing about using the heavy attacks rather than chaining light 3,4 against hordes is that you keep the option of transitioning directly into light 1-2, which is your main single target damage combo outside of the weapon special.
Perk discussion
* Lynchpin: If you're concerned about regenerating your toughness in rooms full of shooters, this is a major part of the solution. You won't always have enemies in range, or want to use heavy attacks. This allows you to hide in cover or just run around sliding and regen your toughness faster, and is a massive boost to your teammates as well. It is the only one that remains useful when you have your heavy bolter out.
* Heavyweight: this perk affects both melee and ranged. Often you'll be able to prioritize ogryn enemies to do extra damage. You don't really have to worry about tanking these hits to res an ally here
* Towering Presence: other options are strong here, but consider the amount of ammo you will get from being in range of your veteran more often, the amount of damage resistance from being in range of your zealot, and the amount of toughness regen you're providing your team with Lynchpin. And consider also situations where you can link the team together and provide those buffs to everyone. This is by far the safest choice here, and it emphasizes mitigating the risk of getting a team that won't stick together closely. There can also be times it's advantages to adopt a loose formation where you can keep everyone in coherency. Bullfighter can let you charge into every elite pack you see and mostly keep charge up anyway, but it can be unnecessary if you have a psyker on your team with psykinetic aura, where towering presence becomes even stronger. With the heavy bolter you won't want to open a lot of elite packs with your charge anyway, as it will put you out of position to maximize your DPS.
* Hard as nails This makes it much safer to pick someone up in the middle of a fight, not being conditional on bleeding enemies near you. It's guaranteed to apply when it counts the most, but disablers. If you're the last man standing you can tank a lot of las fire with just your HP, especially if it's coming from a reaper!
* Raging Bull: Neither this nor Knife through butter are very effective, but raging bull at least lets you use more frequent attacks which will apply more stagger and DPS. Even if you use the heavy attacks fully charging them just takes too long to be worth it in most scenarios, and it's nice to get a substantial bonus even while using lights. Even with the shield and high cleave you won't notice a lot of extra models dying in the psykhanium from Knife Through Butter
* Nonstop Violence: This is nice to have with lynchpin, since you don't have a very easy way to get a lot of toughness back quickly after you've been trading for a while with the bolter. This enables you to have less downtime. Unstoppable is also decent, but you shouldn't use it to make long distance charges away from your team. Charges should generally end within coherency of your team to be safe.
Ability Usage
Don't just charge into every pack of poxwalkers you see. When they are all clumped up they are easy to kill with melee or other options. Your charge doesn't have ammo, but the cooldown means you want to have it available for situations where you need the charge to save a lot of HP or other resources. With that in mind, here are some decent use cases for your charge to use as examples. This list is obviously incomplete:
* Someone is getting thrown around by a mutant in a non-critical situation. This will prevent damage to your teammates without costing a grenade. If you can kill the mutant with your heavy bolter before your teammate takes damage that would be preferable.
* You've been trading with ranged enemies with the bolter and your toughness is low. There are some elites that have gotten in range and are about to attack your allies. Prevent damage from them while
* You're fighting a boss. Use it as early as possible to stun them for your team to get in the DPS, and maybe you'll get it back before the end of the fight as well
Grenade Usage
Your grenade is more limited resource than your charge, and far more limited than ammo. You should conserve them for even more critical situations, when shooting something would take too long. Notably they 1 shot mutants and snipers, but you don't have enough to use them on every mutant or sniper. Save them for situations where a mutant spawns and your team is all occupied dealing with other things, or when you are unable to give the mutant your full attention because of other pressing concerns like a flamer or dog after you. They can also do a ton of boss damage, just line them up carefully to be sure to hit a weakspot. Because they are so damaging and limited it's worth time making sure they connect properly.
The curios
As an ogryn your HP pool is massive, it's silly not to take advantage of that by stacking as much HP as possible with curios. You almost always have an option to disengage or charge when your toughness reaches zero, and having high HP will allow you to take a ton of chip damage through your toughness without issue. Stacking this with the damage reduction if you're the last man alive will allow brush off attacks that would 1 shot other characters, especially from enemies like crushers and reapers. Extra wounds are terrible on the ogryn because you already have 1 more than everyone else, and if you're dying that many times and you have a bad team it's gonna be game over regardless. The extra HP will let you never have to use those wounds.
The damage reduction you can get on curios is very strong on the ogryn also because they multiply your already large effective HP pool. Consider your own playstyle and the enemies you take a lot of damage from. I like to be able to stare down lots of gunners and just shoot them all, so a bit of damage reduction from gunners stacks nicely with all my other innate DR. If you are bad at dodging bombs you might prefer that one, or DR vs snipers if you often fail to dodge their shots.
Toughness DR is probably the strongest curio perk. Whoever did the numbers on the toughness DR perk compared to the increased toughness base stat was not good at math. Toughness DR is far more valuable than % increase in total toughness because it also effectively increases your toughness regen from all sources.
Ultimately until you're rich you'll probably have to take what you can get when it comes to curio perks.