
Table of Contents
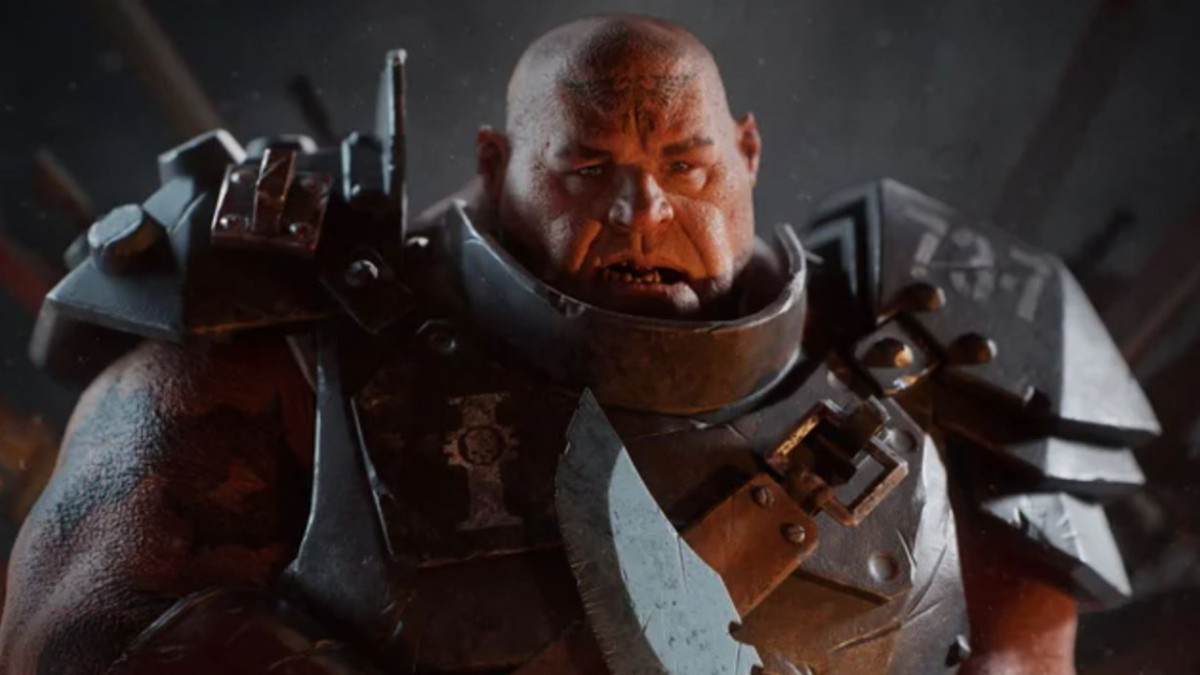
Class

Weapons


Momentum
Hitting at least 3 enemies with an attack, restores +15% toughness.
Slaughterer
+8% Strength for 4.5s on Kill. Stacks 5 times.

Can Opener
Target receives 10-16 stacks of 5% Brittleness on weapon special hit. Lasts 5s
Curios

+13-17% Toughness
+13-17% Toughness
+17-21% Max Health
Talent Tree
Description
Feats
LEVEL 5
Smash 'Em Good!
Really, any of the level 5 feats are good. The primary reason I've chosen Smash 'Em Good! is because I feel like there is more player agency in being in direct control of regaining Toughness.
Pros:
- You will always have the a chance to regenerate Toughness while performing melee combat.
- Regardless of how many allies are around you.
- Regardless of how clumped enemies are.
Cons:
- You NEED to hit enemies with a Single Target Heavy Attack, exposing vulnerability in groups of enemies.
What do I mean?
- Best Form of Defence …
- Pros:
- Good, but not reliable.
- Works good against hordes and small groups of enemies.
- Cons:
- Not good when you're faced with stragglers or well positioned enemies.
- You NEED to hit multiple enemies with a Heavy Attack, exposing vulnerability in groups of enemies.
- Pros:
- Lynchpin
- Pros:
- Good boost to your Toughness Regeneration (it's really good in tandem with the Toughness Regeneration on Curios).
- Reinforces playing together.
- Cons:
- Takes some of the management of Toughness out of the player's hands.
- Not good when you're the last one alive.
- Not good when your allies run ahead, leaving you to deal with a massive horde to solo.
- Takes some of the management of Toughness out of the player's hands.
- Pros:
LEVEL 10
Heavyweight
- Since the primary point of this ranged weapon build is to deal with Ogryn Elites, Heavyweight is a good choice. It provides some good protection against enemy Ogryns, while also providing a nice boost to your melee capabilities against them.
Bombs Away
- Not a bad choice either. This is actually something that will trigger against Ogryn Elites, amongst other enemies with armour.
AVOID
Blood and Thunder
- I'm not saying Blood and Thunder is bad by telling you to avoid it. It works fine if you're building your Ogryn to incorporate bleed effect into their kit. However, that's not what we're doing. So picking this would be a wasted choice.
LEVEL15
Towering Presence
- Pretty self-explanatory. Wandering allies won't negatively affect you as quickly. Also pretty good if you Bull Rush close range, helps to maintain your Coherency while still moving up in the fray.
Bullfighter
- Actually pretty damn good choice. Especially if you're charging into a pack of Crushers, Bulwarks, Reapers, Ragers, etc… If you're getting kills while doing so, you can regenerate your Bull Rush really quickly again and get to the next target or retreat to safety. Another good thing to point out here, especially on Damnation, there are A LOT of elite spawns, so even if your allies get kills, as long as you're in coherency this should kick in pretty regularly.
AVOID
Lead the Charge
- Again, I'm not saying this is a bad feat. I think this feat is really strong in the right hands. But it really requires coordination. I also think the other feat options at level 15 are just better choices in general that have more potential.
LEVEL 20
I'm going to say it first. None of these feats feel particularly well thought out. Bloodthirst seems fine if you're going for a blood build, but Die Hard and Hard As Nails? They're counting on your team being down or dead and/or you about to be. Yes, these could be much better.
Choose either Die Hard or Hard As Nails. I'm not going to get into the mundane details of explaining these two feats as they're pretty much just anticipation for bad situations. Choose whatever makes you more comfortable.
AVOID
Bloodthirst
- Like Blood and Thunder, because we're not focused on a blood build, this is kind of useless in this build.
LEVEL 25
Knock em' down, beat em' up
- This is pretty effective. Works well with both your Bull Rush and Ripper Gun burst fire stagger.
- Once you have the buff it will start to timeout, but there is a very large grace period before you lose it.
- You can restart the timeout window by continuing to stagger enemies.
- Will be consumed with your next Heavy Attack.
Raging Bull
- This is a pretty good tool in horde clearing. Since you're more than likely going to be spamming light attack and cleaving a lot of horde enemies.
- Get good stacks, but they need to be precise.
- Need to make sure you're hitting units.
- Can't just spam click or you will lose your buff when you miss.
- Get good stacks, but they need to be precise.
AVOID
Payback Time
- I suppose this could be ok if you really are comfortable with letting enemies hit you to gain bonus damage. I'd just as soon protect myself than deal with the consequences.
LEVEL 30
Unstoppable
- This is actually really strong. HUGE distance.
- Press backward to cancel your charge early, so you stop precisely where you mean to.
- Stagger through as many Elite Ogryn as the game can throw at you.
- Couple this with Bullfighter and charge into all the Elites you want.
- Pull out your Ripper Gun and start going nuts.
- Couple this with Bullfighter and charge into all the Elites you want.
Non-Stop Violence
- The smart choice if you're playing more conservatively.
- Reserved your Bull Rush for when you need toughness fast.
- Also works pretty well with Bullfighter.
- You will be stopped at the first Ogryn Elite you run into.
- Kill Elites with your Ripper Gun to refresh your Bull Rush.
- Bull Rush again to replenish more Toughness.
AVOID
Bull Gore
- Bleed Build main attraction. Not useful here.
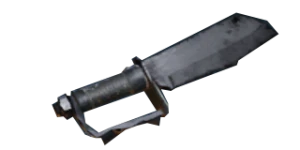
Bull Butcher Mk III Cleaver
BLESSINGS
Momentum
- Paramount for horde clearing safely.
- Maintains your toughness levels.
Slaughterer
- Pretty fantastic, making your kill potential grow exponentially when you get into the thick of things in a horde.
Honourable Mentions
Alternative choice for Momentum Slot
- Confident Strike
- Maintains your toughness levels on chained attacks.
Alternative choices for Slaughterer Slot:
- Tenderizer
- It's actually a lot of fun. Start combo with a Special Attack and gain an additional 15% Power on your next 3 attacks. Is it better than Slaughterer? well no. Sometimes you just want to change your melee style and upper-cutting everything is a lot of fun.
- Thrust
- Not a bad choice if we're going to focus on Heavy Attacks.
- This is actually a significant damage increase.
- Pairs well with Feats
- Smash 'Em Good & Best Form of Defence
- Knock em' down, beat em' up
- Heavyweight
- Unstoppable (Staggering multiple Ogryns)
- Pairs well with Feats
- Savage Sweep
- Increases how many enemies you can cleave through.
- Increases your overall cleave damage.
- Not restricted to Heavy or Light Attacks.
Avoid These
- Unstoppable Force
- Hit unlimited enemies with your cleaves.
- Unlike Savage Sweep, this does nothing for your cleave damage.
- You are limited to Heavy Attacks
- Will not trigger on Light Attacks.
- Bash
- Critical chance is not really worth it much in my opinion, especially since we're not putting any stock into crit perks.
- Devastating Strike
- Relies on chance or weak spot to trigger, unlike Unstoppable Force.
- Only ignores hit mass, no real added value over the other Blessings.
PERKS
Feel free to change the perks with whatever you're comfortable with. You could change one to Unarmoured Enemies (since you're primarily going to be fighting them off with melee) and the other to Melee damage vs Elites or whatever ideas you might have. I don't do the former because, while the Cleaver does take some time to kill horde enemies, I never really feel like I'm in danger while doing so, and Slaughterer helps kill fast enough anyway.
This is why Flak and Maniac perks have been chosen. These will help fight off many Elites and Specials as a good chunk of them reside in these 2 Armour types.
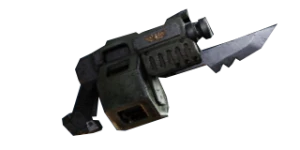
Foe-Rend Mk II Ripper Gun
This is the weapon we use for enemy Ogryns. The perks and Blessings on this delete Ogryns really well. You will come across a lot of Crusher Patrols in Damnation, and that's the primary reason you're bringing this gun along. With the Can Opener blessing, we can decimate Crusher Patrols singlehandedly. It's actually a lot of fun deleting entire patrols by yourself!
That's not to suggest this weapon is used exclusively on Ogryn Elites. Please, feel free to use it on Maulers, Ragers, Hounds, Flamers, etc… It's quite great at taking a lot of the specials and elites down quickly, without needing to use the Can Opener special attack. Try to resist taking out horde enemies with it.. However, you will likely need it against Dreg and Scab Stalkers and Scab Gunners, as they're ranged and are taking down your toughness. Just remember your ammo is finite and so is your ally's.
Though this weapon can still be useful in long drawn out gun fights, It's not very good at range, even with a good range stat, so don't expect to get a lot of kills with it when you're firing into the gunners at long distances, while they're hiding behind cover. This thing has a lot of recoil and is not very precise. That's fine, that's not what we're bringing it for.
BLESSINGS
Can Opener
- At Blessing rank 4, this adds 40% Brittleness to a target for 5 seconds!
- Killing a Crusher with this setup SHOULD be executable in 3 actions: Use weapon Special, then hip fire on them twice.
- If your damage stat is not great on your Ripper, you may need a third shot.
- If you're low on Ammo, you should still use your special attack and pull out your Melee weapon. Your special attack on the Ripper Gun applies Brittleness on the target, and not your gun, so you and your allies can all benefit from having the blessing even if you have no ammo.
- Keep in mind we are also taking the Heavyweight Feat, so you are doubling up on melee damage against Ogryns, plus mitigating 40% of the target's armour on top of that.
- The toughest Ogryn Elites to deal with are probably Bulwarks because they have a tendency to block even from obscure angles, and have 2700 HP (150 more than Crushers) and are covered in Unyielding armour, though they do have Carapace on the hands and shoulders. They are a bit trickier mainly because they have impenetrable shields from the front.
- 2 hip fire bursts shots at point blank range directly into their shield should stagger them, then you're free to do the combo and quickly take them out as well.
- Reapers are also pretty tough, as they have 3750 (1200 more HP than Crushers) and have Unyielding armour as well. However, if you manage to find IV Can Opener and 80% damage on your Ripper Gun, you should still be able to two shot the Reapers at close range after hitting them with Can Opener.
Inspiring Barrage
- Plays into this style of play well, I think.
- Good choice to regain Toughness at range when there is nothing around to whack.
- We're not really anticipating using our gun in close range to replenish our Toughness, but it can come in handy in a bind.
- Consider Bull Rushing into a pack of gunners, and not quite getting in melee range to disrupt their firing on you. After you've taken out the gunners in your immediate radius with melee, hopefully keeping your toughness high. If you're still out of melee range on the other gunners, pull out your Ripper Gun and unload it.
- Consider Bull Rushing into a pack of gunners, and not quite getting in melee range to disrupt their firing on you. After you've taken out the gunners in your immediate radius with melee, hopefully keeping your toughness high. If you're still out of melee range on the other gunners, pull out your Ripper Gun and unload it.
Honourable Mentions
Terrifying Barrage is actually quite good at supressing gunners when you Bull Rush into a group of them.
- IV Blessing supresses in 8 meters from a kill, and is quite effective at charging into suicidal areas
I don't find using the Ripper at range to be very efficient, buffing long range engagements isn't exactly Ideal.
However, these blessings still work at close-medium range quite well, so keep that in mind
Cavalcade
- If you decide you want to run +10% Critical Damage as your secondary perk on the Ripper.
Blaze Away
- Helps you deal damage at medium-long range. It's pretty decent choice, but I prefer the other two options above.
Avoid These
- Born in Blood. At max 3% Toughness, Born in Blood just does not provide enough benefit on Damnation. say you kill 6 Crushers in a small window, lets say 7-10 seconds. That's only going to net you 18% total toughness… You could pull out your Cleaver and hit the same 6 Crushers with 2 heavy attacks and gain +20% Toughness in a much smaller window. While I like the idea, I don't think it's at all worth it.
- Fire Frenzy activation is just way too short. If it was 2-3 seconds, it would be really good with the Can Opener combo...
- 1.75 seconds is just not enough time when you have to account for dodging Crusher swings and other fodder or even just getting in range for the next target. It's also completely unnecessary to kill enemy Ogryns quickly.
- It COULD be usable with alternate fire mode, but you have to really be on point in order to benefit from this Blessing, and I just don't see it being worth while.
PERKS
+25% Damage (Carapace Armoured Enemies)
- I've tried running the Can Opener IV Blessing without this perk.
- With: Combo is Special Attack + 2 Hip Fire Bursts.
- Without: Combo is Special Attack + 3 Hip Fire bursts.
- That's one extra attack per Crusher, which starts to add up when the Director decides it wants to spawn more than 6 of them.
- This combo is why we're bringing this gun along. So make the Combo worth it's price.
+10% Ranged Damage (Elite)
- A nice bit of extra damage to cover all Elites.
- Does not provide the same specialization that other perks have.
- Not necessary for the Combo.
- Feel free to choose another Perk that is more suited to your playstyle.
- There are several good and several bad below.
The Good
+25% Damage (Unyielding)
- Good as it will help take down Reapers, Bulwarks, and Monstrosities at medium range.
- Monstrosities I still recommend using Can Opener combo, if you have the opportunity. Use your judgement, don't chase after it just to hit it with your special before unloading your ammo into it.
+25% Damage (Flak) or (Maniac)
- Both are good options.
- They will help take down some specific Specials and Elites, while not affecting others.
+10% Range Damage (Specialists)
- If you want more coverage on Special enemies without being too specific as I have done above with the Elite Perk.
- If you tend to find that Specials survive just long enough to be more annoying than Elites (and they do tend to spawn more frequently) this might actually be something to consider if you're taking a less specific target approach.
+10% Ranged Critical Damage
- Specific to Cavalcade, which boosts Critical Chance by up to 20%. Something to consider when running the Cavalcade Blessing.
- Covers all damage types Elites, Specials, Monstrosities, all the way down to the lowly horde enemies.
- Outshines the +10% Ranged Damage (Elite) or (Specialist) in total damage, but only under continuous fire.
The Bad
- Reload Speed
- I'm on the fence. Might be decent, dispatch those Crusher Patrols sooner, but I don't find the Ripper Gun to have terrible reload times to begin with
- +10% Ranged Weak Spot Damage
- The Ripper Gun is actually fairly inaccurate at anything outside of close-medium range. Not to say it's extremely difficult to hit weak spots with it. It's actually fairly easy on some enemies.
- I don't think it's reliable.
- Not worth sacrificing better options for.
- The Ripper Gun is actually fairly inaccurate at anything outside of close-medium range. Not to say it's extremely difficult to hit weak spots with it. It's actually fairly easy on some enemies.
The Ugly
+25% Damage (Unarmoured).
- I have advised to not fire into hordes unless absolutely necessary, and that's the primary grouping of Unarmoured enemies, though there are some edge cases like Snipers which are unarmoured, you really shouldn't be waste your perk slot on that.
+25% Damage (Infested).
- As above, there's just not enough Infested enemies to make this worth choosing.
+1 Stamina.
- Just don't. Useless and not necessary.
Curios
- Good balance of Toughness and HP, both sitting at 40%.
- I don't believe jacking your HP up is necessarily a bad idea, but usually it comes at the cost of your toughness levels. Yes, HP is finite, so it's good to have more of it. But in my opinion, Toughness is your protection against losing HP in the first place, and it can be regenerated fairly easily… if you see where I'm going with this. A nice balance of both is actually better suited to me. You're still increasing HP, just not over doing it. This also buffs your survivability. No matter how much HP you have, lacking in toughness won't help you survive the viciousness of Damnation; you're going to eat through whatever HP you've amassed if your toughness level is too low.
- The Damage Resist perks are there to protect from the onslaught of Gunners and Snipers you will face in Damnation. There will be a lot. Especially if you're going to Bull Rush into precarious locations. The added protection will help you come out of suicidal charges relatively unscathed.
Ultimately you can choose whatever you want for your Curios, but in my opinion, these are good baseline perks to chase after.
Honourable Mentions
Toughness Regeneration Speed
- This is good if you area stay at home Ogryn. That is, if you are staying in currency and playing it safe.
- This regeneration is only applied to toughness that restores over time. This includes coherence bonus or bonuses such as Inspiring Barrage.
Sprint Efficiency
- This on top of your Bull Rush movement speed bonus makes your sprint at the end of Bull Rush so much faster.
- Factor in that Ogryn have the highest base Stamina in the game, and naturally you are sitting around 9 to 11 Stamina depending on your weapon choice.
Stamina Regeneration
- This isn't absolutely necessary in my opinion. I tried out a couple different setups with it. Negligable effects.
- Some use if you are doing a speed run build with Sprint Efficiency.