
Table of Contents
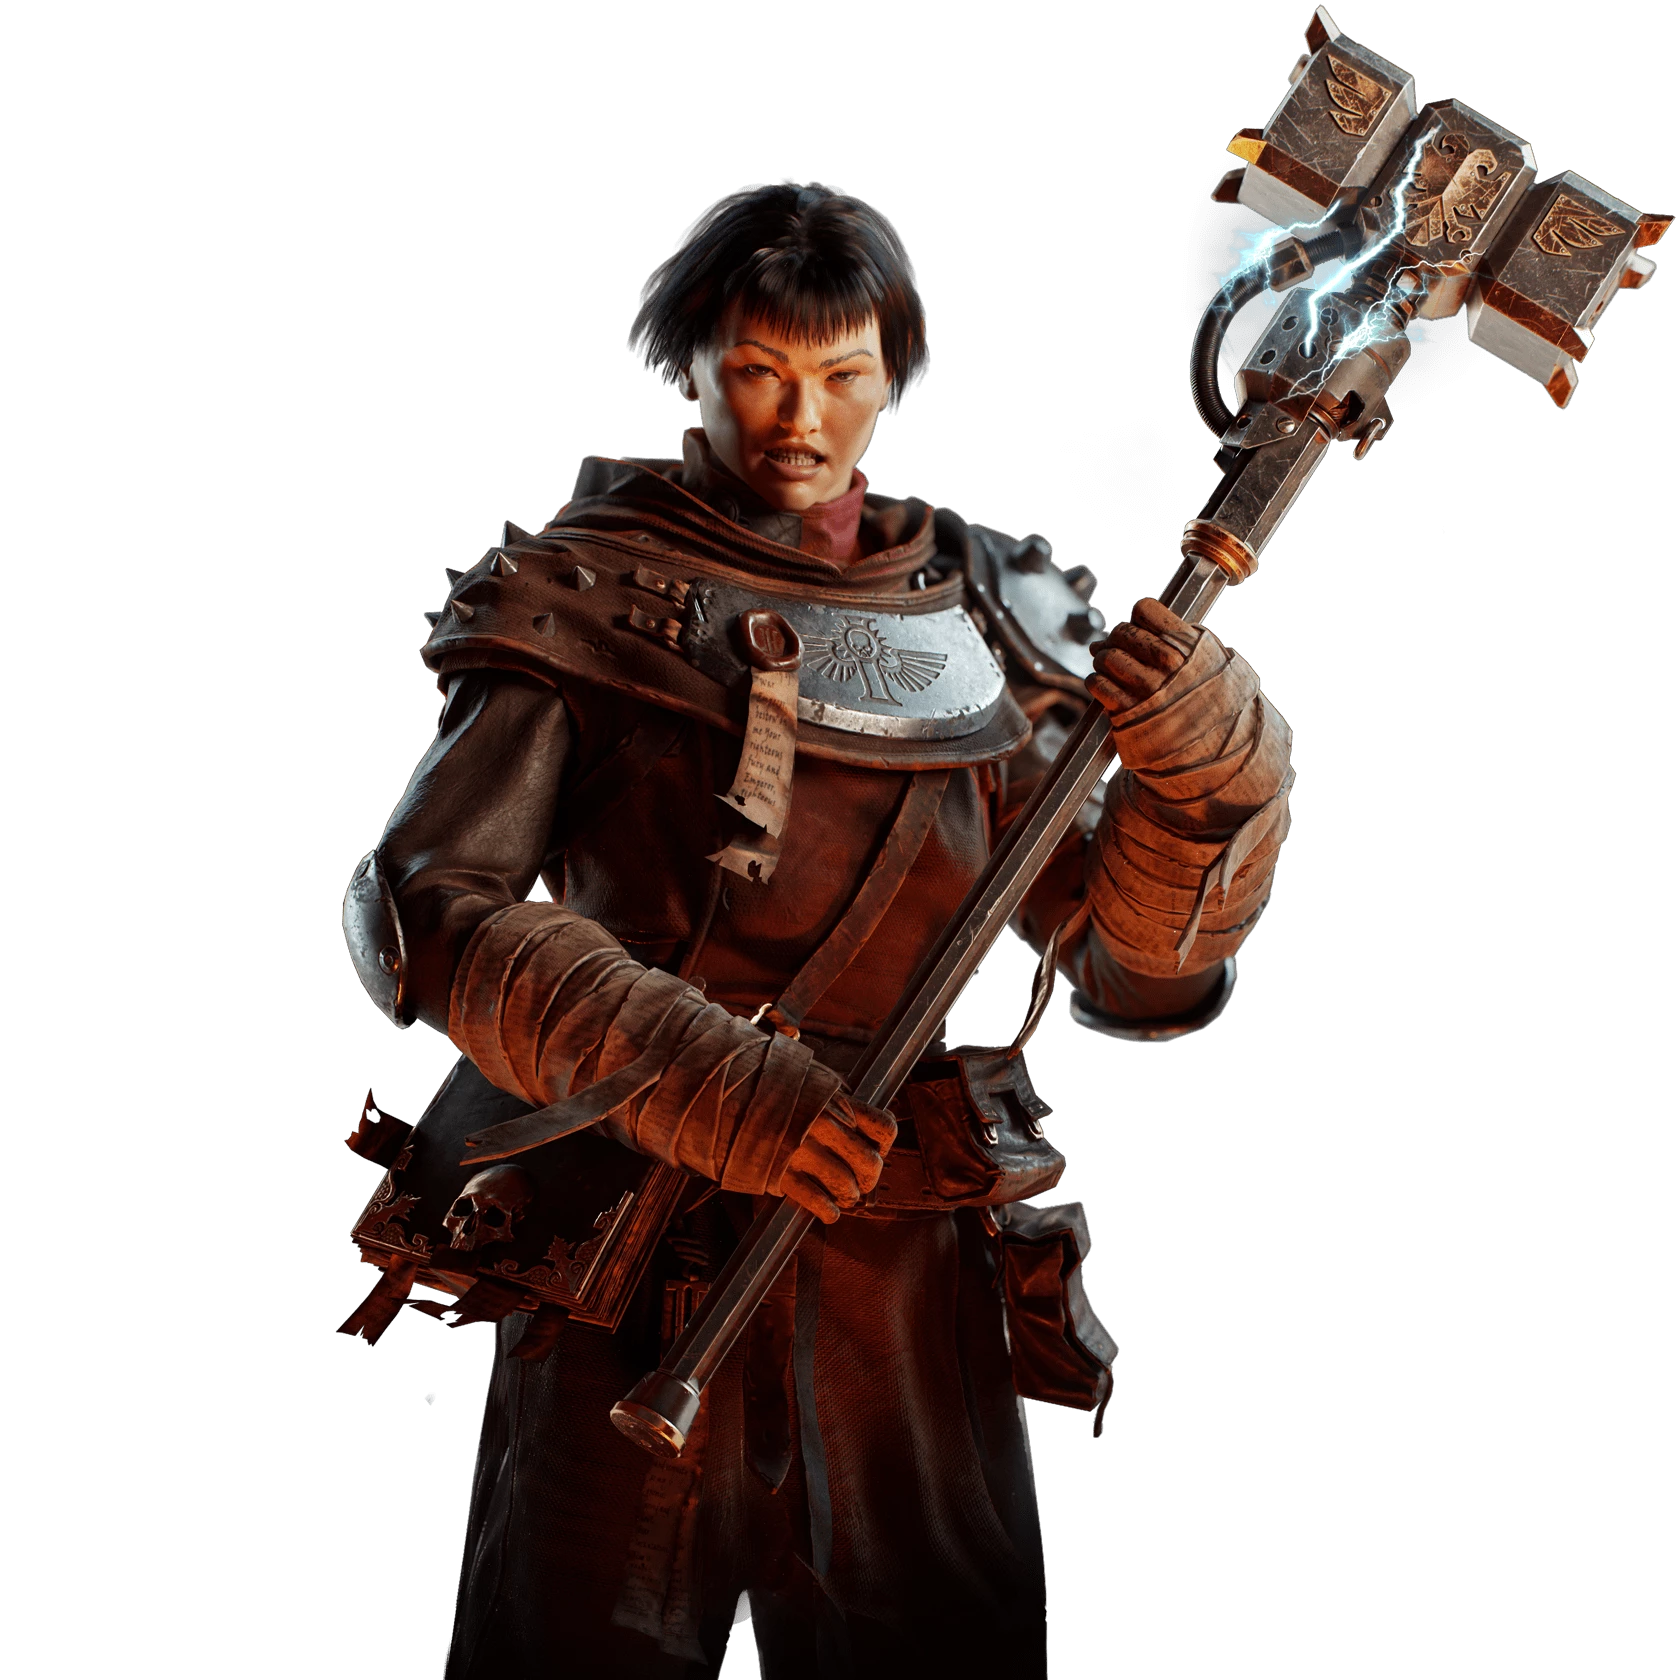
Class
Weapons


Cranial Grounding
Reduces Heat buildup by -6% and increases weakspot damage by +4% for 3s on chained weakspot hits. Stacks 5 times.
Heatsink
Weakspot Kills and Critical Strike Kills reduces Heat by +10% over 3s.

Blaze Away
+8% Strength for every 10% of magazine spent during continuous fire. Stacks 5 times.
Overpressure
Up to +5% Strength, scaling with remaining Ammunition. Stacks 5 times.
Curios

+1 Wound(s)
+1 Wound(s)
+13-17% Toughness
Talent Tree
Description
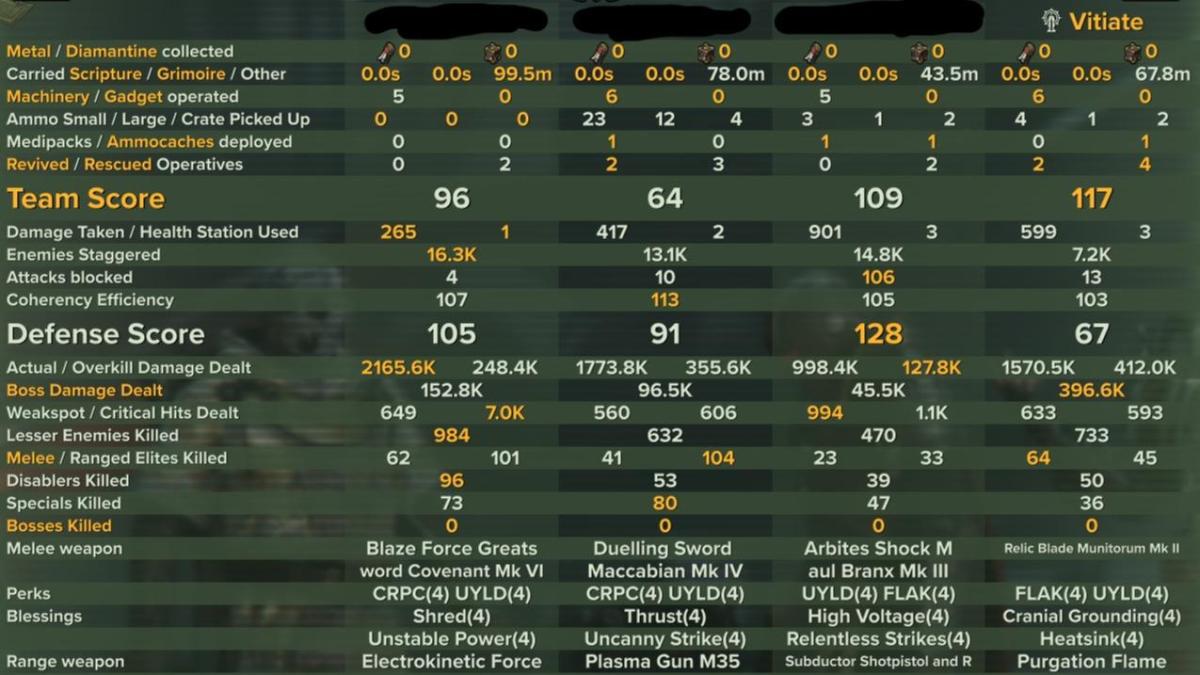
HAVOC 40 | SHROUD MARTYR ASSASSIN - RELIC
Here is my H40 build for a stealthy Boss killer, CC Zealot using the Relic Blade, Flamer, and Martyrdom.
BUILD CONSIDERATIONS
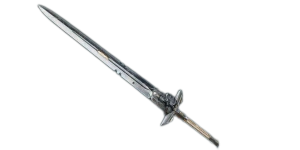
MELEE
- Relic II (or X)
- Flak, Unyielding
- Flak is needed to hit the breakpoint for 1 shotting captains.
- Cranial Grounding, (Heatsink, Wrath, or Rampage)
- Moveset for II (My preference of Marks)
- Bosses
- Impale Killshot
- Block Cancel > W + Sprint > Shroudfield > Stab
- The most common error made when mastering this is that people will dodge backwards/sidewards and not Block Cancel and move forward.
- Impale Killshot
- Elites & Bosses
- Light > Light
- Light > Light > Heavy / Heavy x Repeat
- Light > Light > Heavy / Light x Repeat
- Block Push > Light > Heavy x Repeat
- Block Cancel > W + Sprint > Shroudfield > Stab / Light x Heavy Repeat
- Hordes
- Heavy > Heavy / Light > Heavy x Repeat
- Block Push > Heavy > Heavy > Heavy / Light > Heavy x Repeat
- Bosses
- Flak, Unyielding
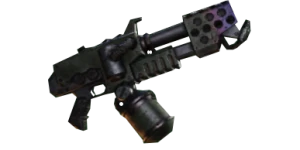
RANGE
Purgation Flamer
- Unyielding, (Maniac or Carapace)
- Blaze Away, (Overpressure or Penetrating Flame)
CURIOS
- +1 Wound - Revive, Toughness, Stamina
- +1 Wound - Revive, Toughness, Gunner
- +17% Toughness - Toughness, Gunner, Stamina
The combination of Enemies Within, Enemies Without, plus 3x 5% Toughness Curios basically gives you two +17% toughness curios, Restorative Verses, Faith's Fortitude and the 2 Wounds allow you max out Martyrdom stacks granting all the Damage Reduction.
You will be very tanky, and very clutch.
H40 TIPS
A few tips when playing the character
- Martyrdom Stacking
- Ideally, you obtain all Martyrdom stacks without corruption. This will be done via hitting barrels ASAP.
- Hit a barrel, stand in fire, or get exploded into the air to take damage to start getting stacks up.
- Ideally, you obtain all Martyrdom stacks without corruption. This will be done via hitting barrels ASAP.
- Relic Blade Heat Management
- Micromanaging this is key. The Blessings will help mitigate heat build up. But you will still have to be mindful of things
- A few strategies here
- Get used to swapping back and forth while moving to turn off the weapon and trigger cooldown (It's faster than pressing the button to deactivate)
- Once maxed out Martyrdom stacks are achieved
- Prioritize the following for activating the weapon
- Carapace Elites
- Reapers
- Bulwarks
- Gunners
- Specials
- Trash mobs
- It's important to note that Specials and Disablers die very quickly to a non-activated Light > Light OR Light > Light > Block Cancel x Repeat
- Don't waste heat if you don't have to
- Trash mobs can be killed fairly easy without heat
- Don't waste heat if you don't have to
- 1-3 Gunners, Specials, Trash
- Don't waste heat if you don't have to
- Prioritize the following for activating the weapon
- Mixed hordes
- If you do overheat
- Retreat > Switch to Flamer
- By about 50% done with Flamer you should be back to using your Relic Blade if you have to
- Retreat > Switch to Flamer
- If you do overheat
- Boss Fights
Boss Identification, Boss Attacks, Teammates and Positioning will be key to demolishing any boss in the game.
- Nurgles
- The most important thing when killing a Nurgle is: what are your teammates doing to prompt the stomp attack?
- The most common thing that happens is that a Shroud Zealot sees the weakpoint, gets tunnel vision, then tries B-Lining towards it only to get stomped by the Nurgle sending them flying and wasting their Shroudfield.
- And why did that happen? Your teammate triggered an attack and you ran right into it.
- The most common thing that happens is that a Shroud Zealot sees the weakpoint, gets tunnel vision, then tries B-Lining towards it only to get stomped by the Nurgle sending them flying and wasting their Shroudfield.
- Before attacking, evaluate your surroundings, and what your teammates are doing. And know that it's okay to wait a few seconds before smoking the Nurgle.
- The most important thing when killing a Nurgle is: what are your teammates doing to prompt the stomp attack?
- Monstrosities
- Unfortunately, even in H40, most of your teammates seem to be unaware that you can block all attacks, unless it's an overhead.
- Once you identify the boss get into position.
- Then immediately identify what your teammates are doing.
- If they keep running, then don't even bother. Just chase after them and the boss. Wait for the boss to trigger an attack animation before beginning the attack sequence.
- If they retreat back and stop. Immediately pursue because they are baiting the boss into a kill shot.
- Captains
- The most important thing to pay attention to is their shield and how quickly your team is killing it.
- Once it hits 25-33% get into Position
- Make sure you have space to avoid getting staggered by the shield explosion
- The Captain animation very much resembles that of WWE professional wrestling. It gets knocked over, gets up, and oversells it's dazed and confused state.
- You want to wait for the Captain to stand up. You in this case are John Cena, The Rock, Goldberg etc. waiting to perform your special move.
- Once he's up you attack.
- Block Cancel > W + Sprint > Shroudfield > Stab
- You want to wait for the Captain to stand up. You in this case are John Cena, The Rock, Goldberg etc. waiting to perform your special move.
- Once it hits 25-33% get into Position
- The most important thing to pay attention to is their shield and how quickly your team is killing it.
- Twins
- Same idea as Captains with a couple different notes
- Know which Twin is which
- One twin (sister) is aggressive and melee oriented.
- The other twin (brother) is ranged, and trap oriented, but very slow.
- Always try to split them apart by B-Lining it backwards across the map.
- Then you can gangbeat the sister with ease
- Nurgles
- Clutch Revives
- With 45% Revive Speed, you are the uber-clutch revive class in the game.
- Spare using Shroudfield on these as much as possible. If not, burn it to get someone back up.
- As noted in several of my builds - Even though I present many as damage dealer builds, I pride myself (as should you) on being a good teammate.
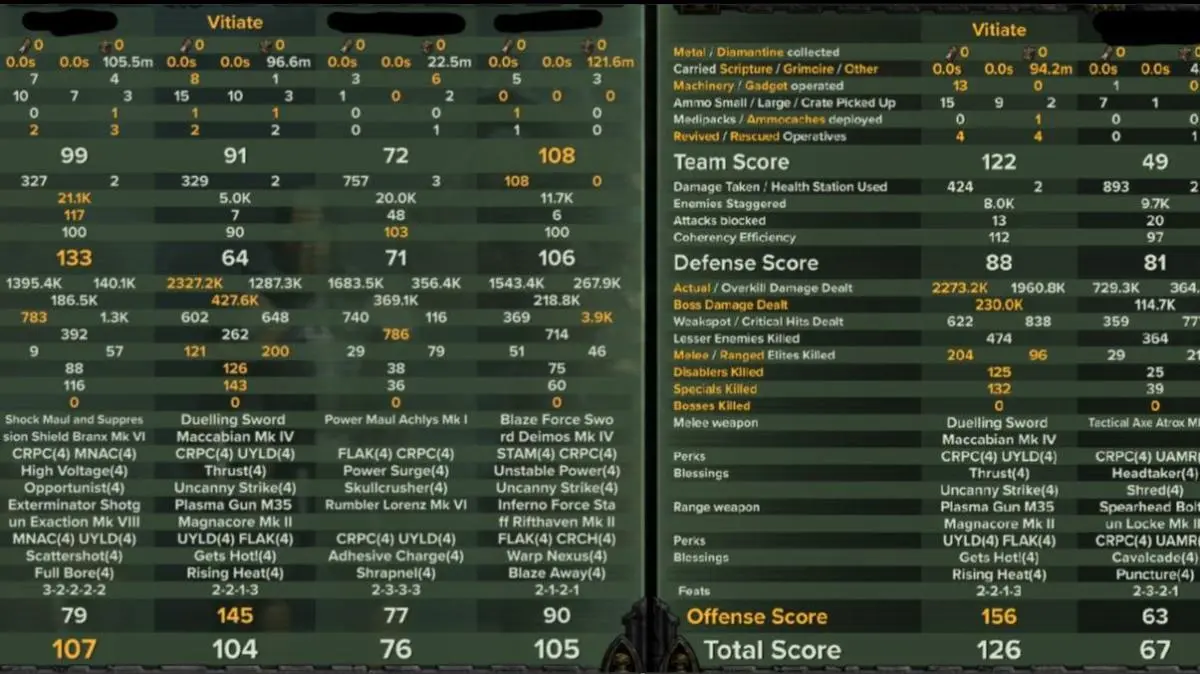
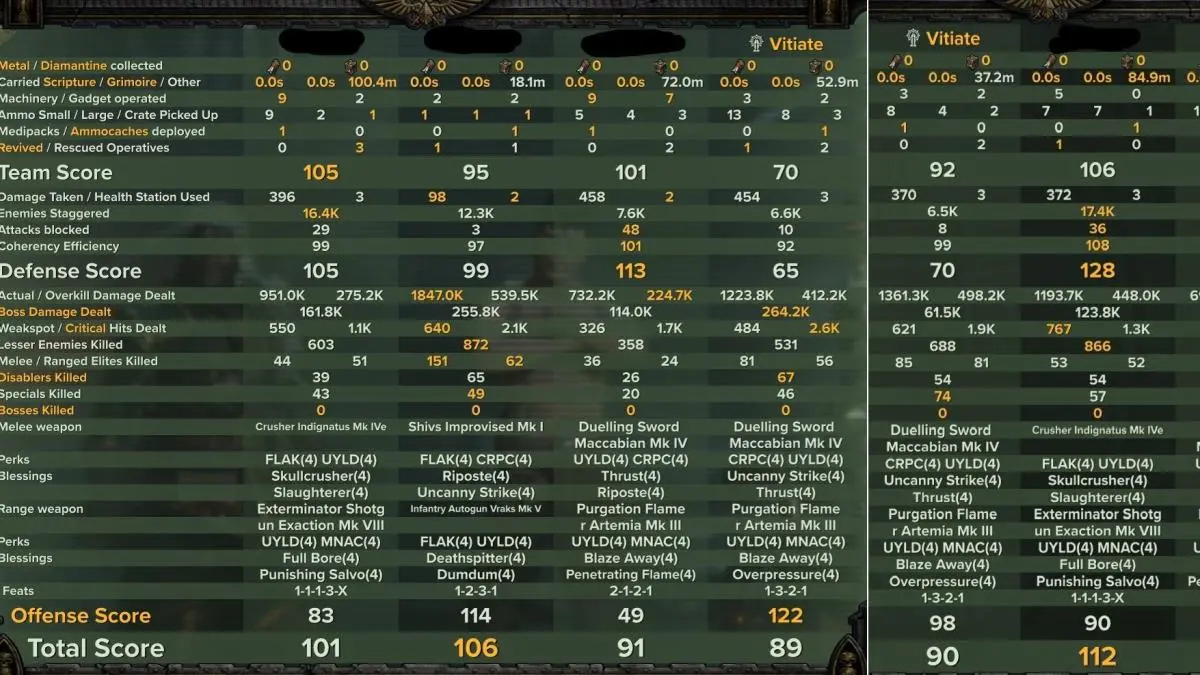
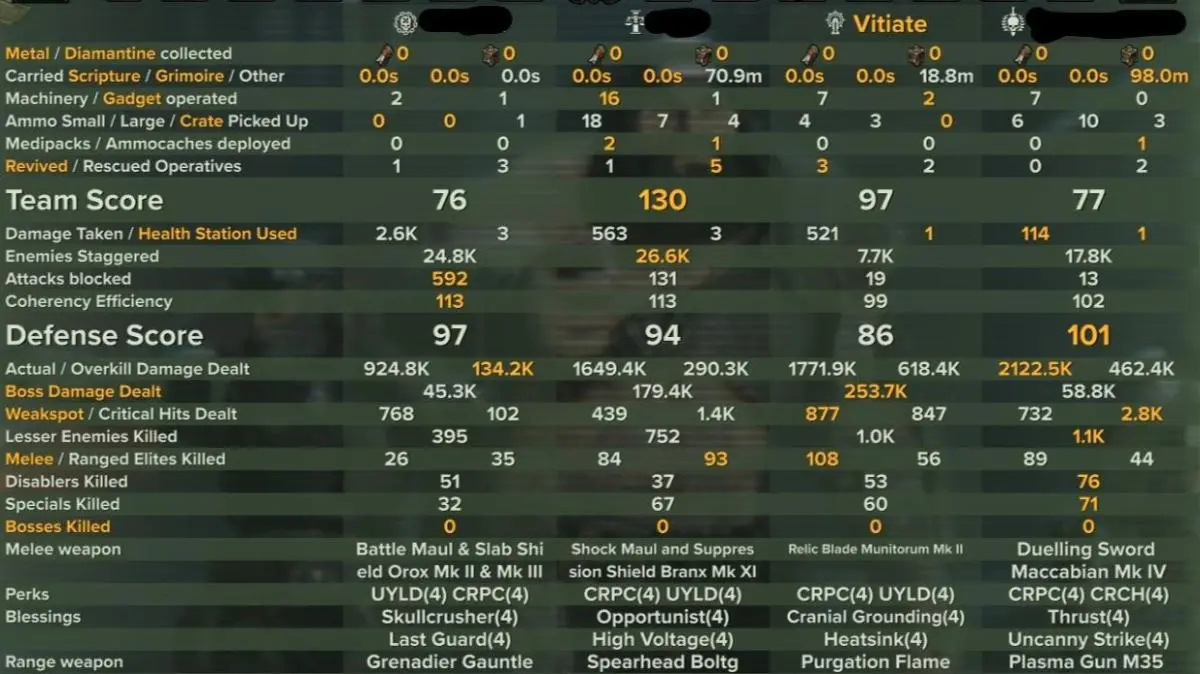
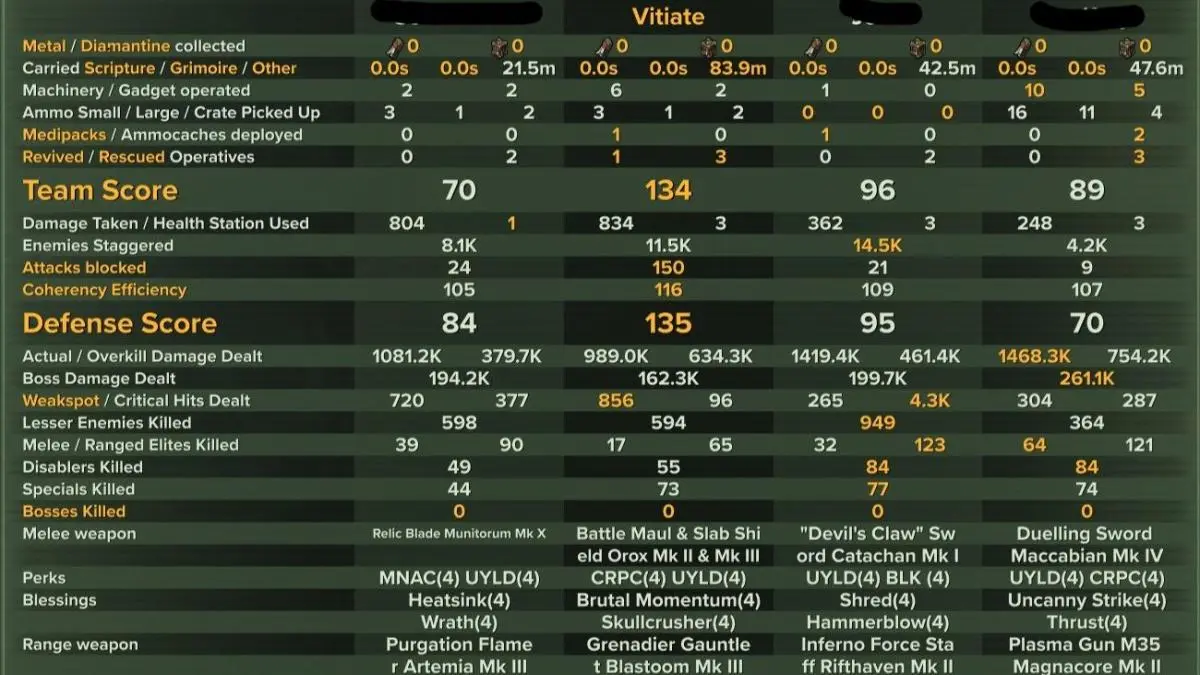
- 1.5M Damage + 2 Revies + 4 Rescues
- With 45% Revive Speed, you are the uber-clutch revive class in the game.
Other builds by Vitiate

Havoc 40 | Vet | 4M Nade Weapon Specialist
By Vitiate • Updated 2 months ago

Havoc 40 | Zealot | 1.5M Blazing Fury Warrior - Duelling Sword
By Vitiate • Updated 19 hours ago
Havoc 40 | Zealot | 1.75M Fury Martyr Warrior - Relic Blade
By Vitiate • Updated 19 hours ago

Havoc 40 | Ogryn | 1M Shield-Tank-gryn
By Vitiate • Updated 2 months ago