Table of Contents
Class
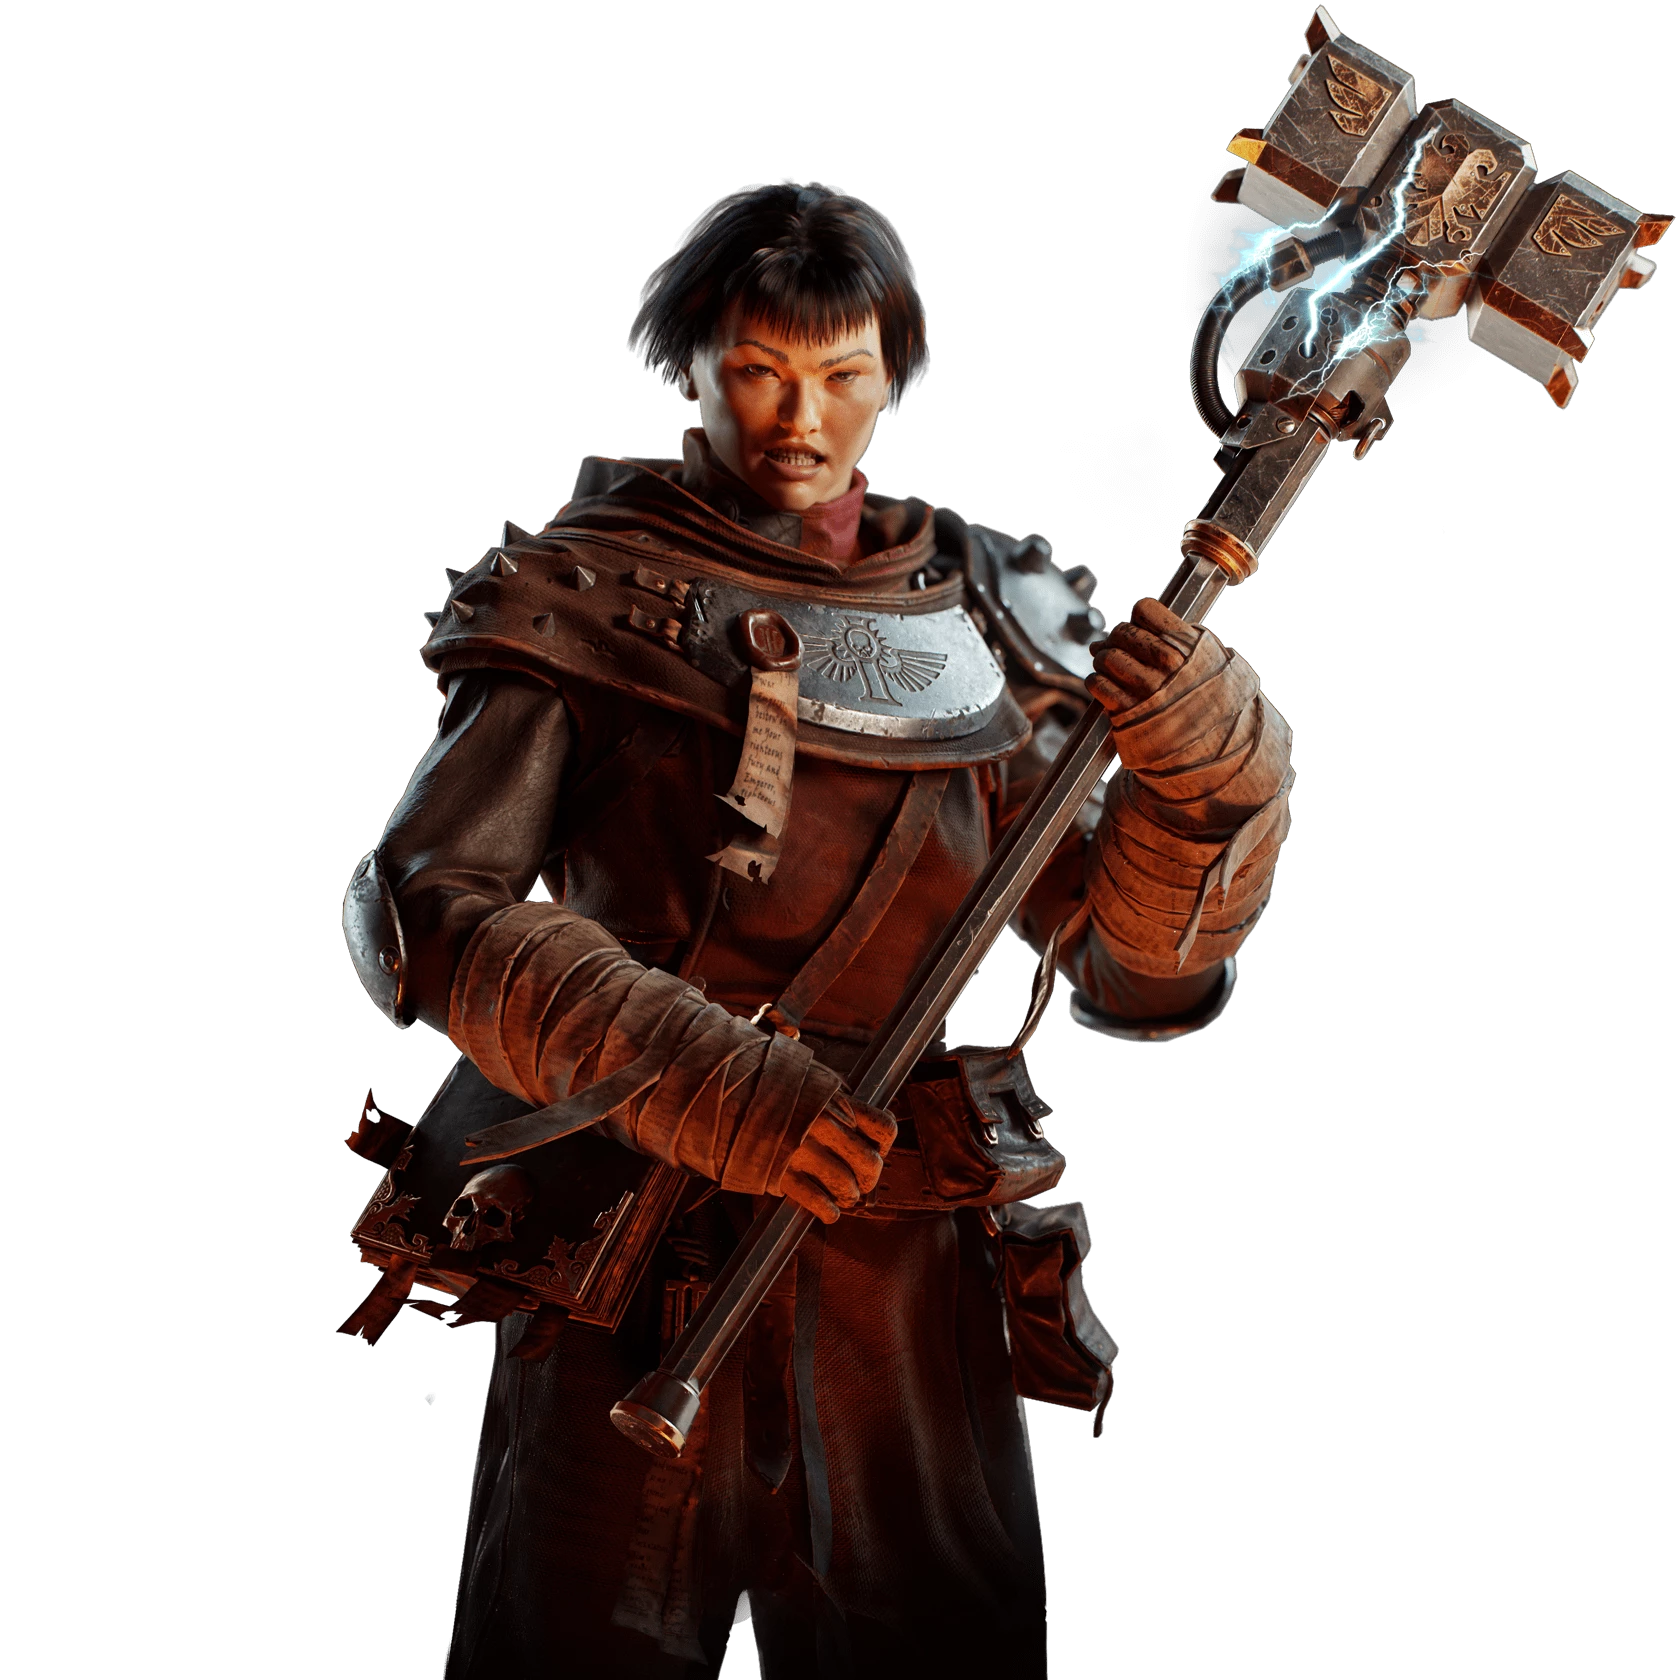
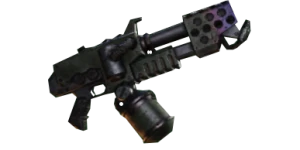
Weapons


Cranial Grounding
Reduces Heat buildup by -6% and increases weakspot damage by +4% for 3s on chained weakspot hits. Stacks 5 times.
Heatsink
Weakspot Kills and Critical Strike Kills reduces Heat by +10% over 3s.

Blaze Away
+8% Strength for every 10% of magazine spent during continuous fire. Stacks 5 times.
Overpressure
Up to +5% Strength, scaling with remaining Ammunition. Stacks 5 times.
Curios

+1 Wound(s)
+1 Wound(s)
+13-17% Toughness
Talent Tree
Description
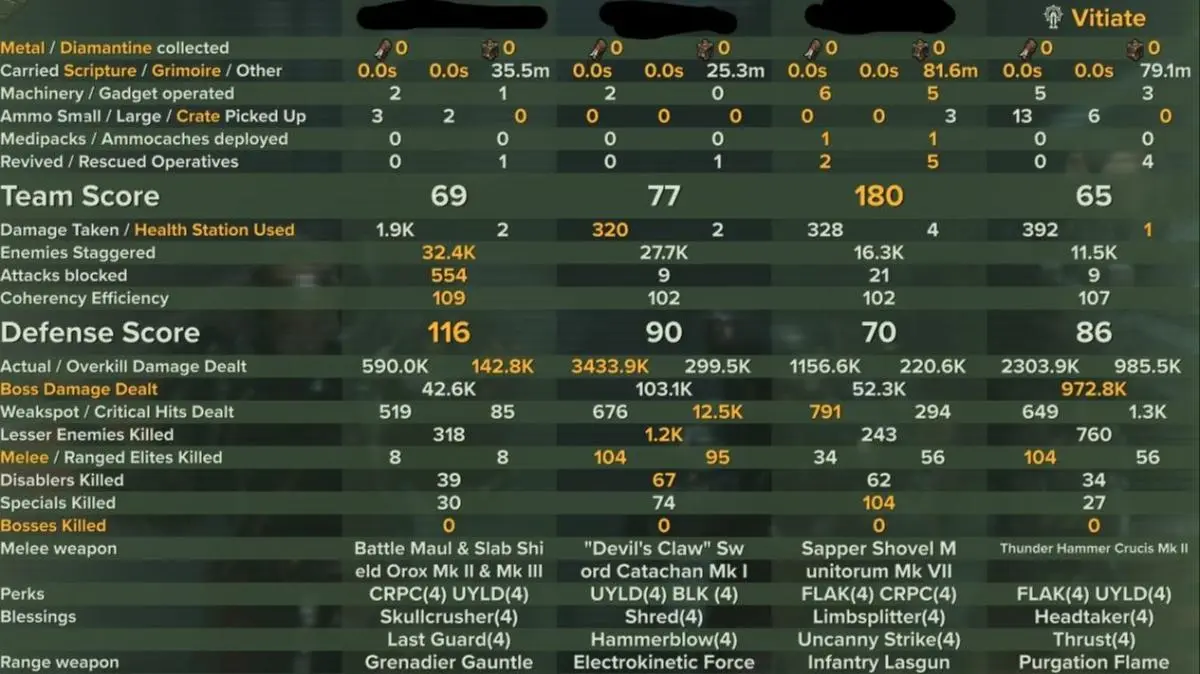
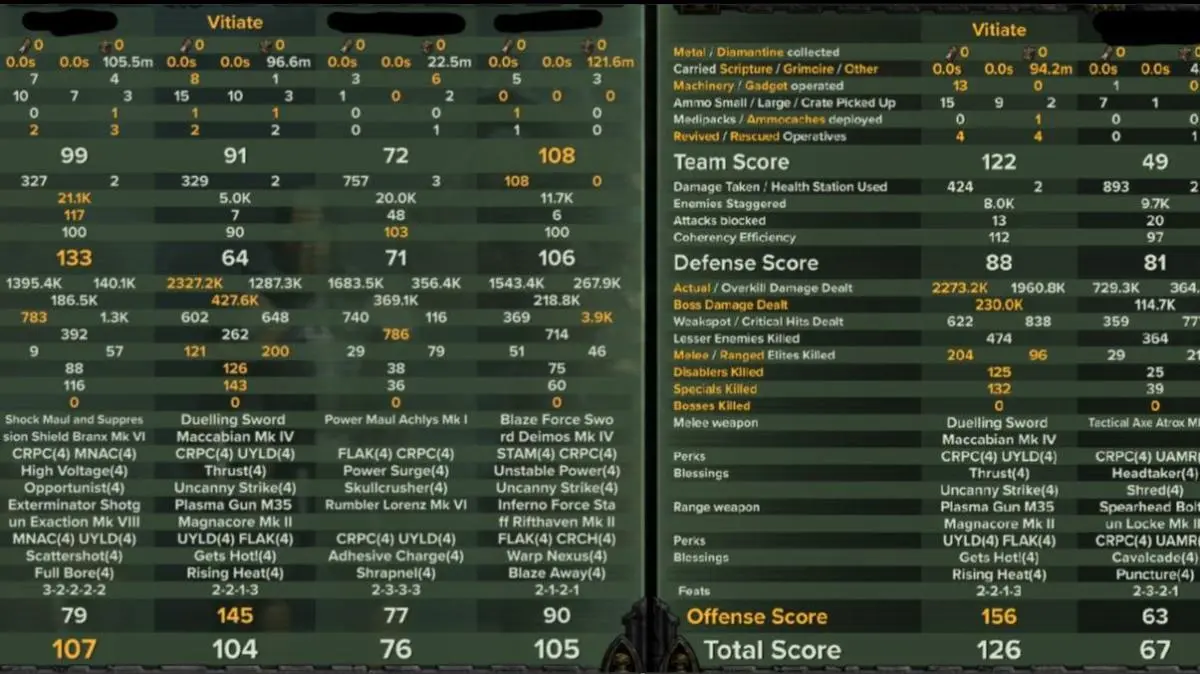
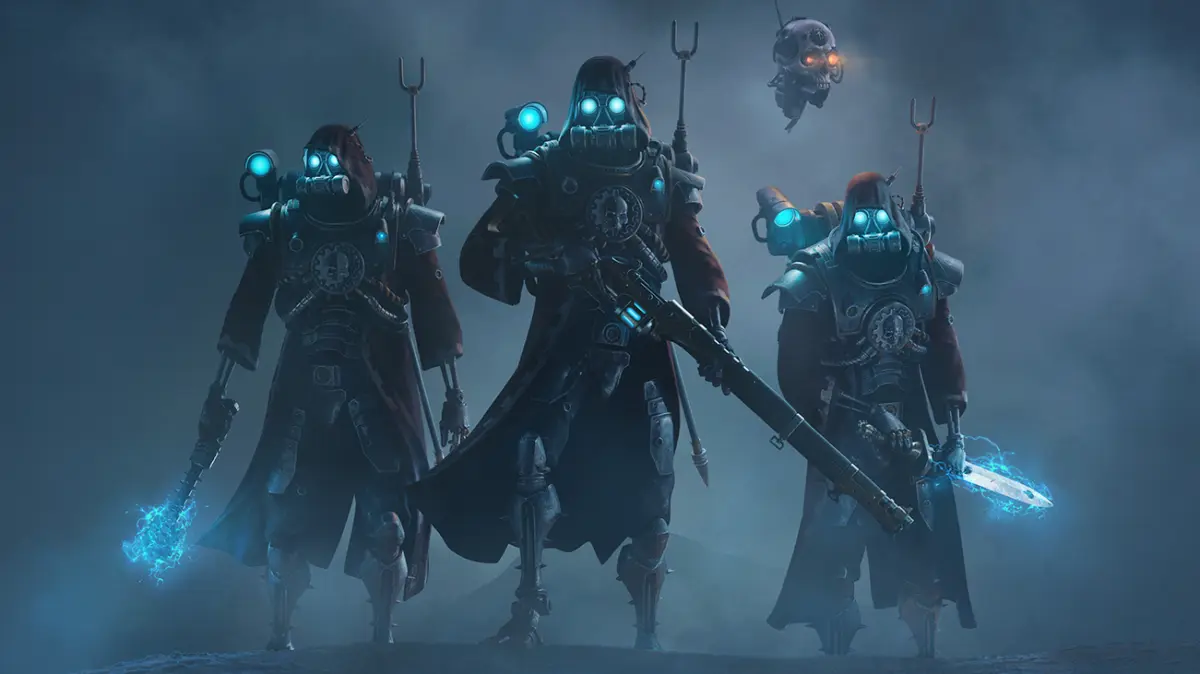
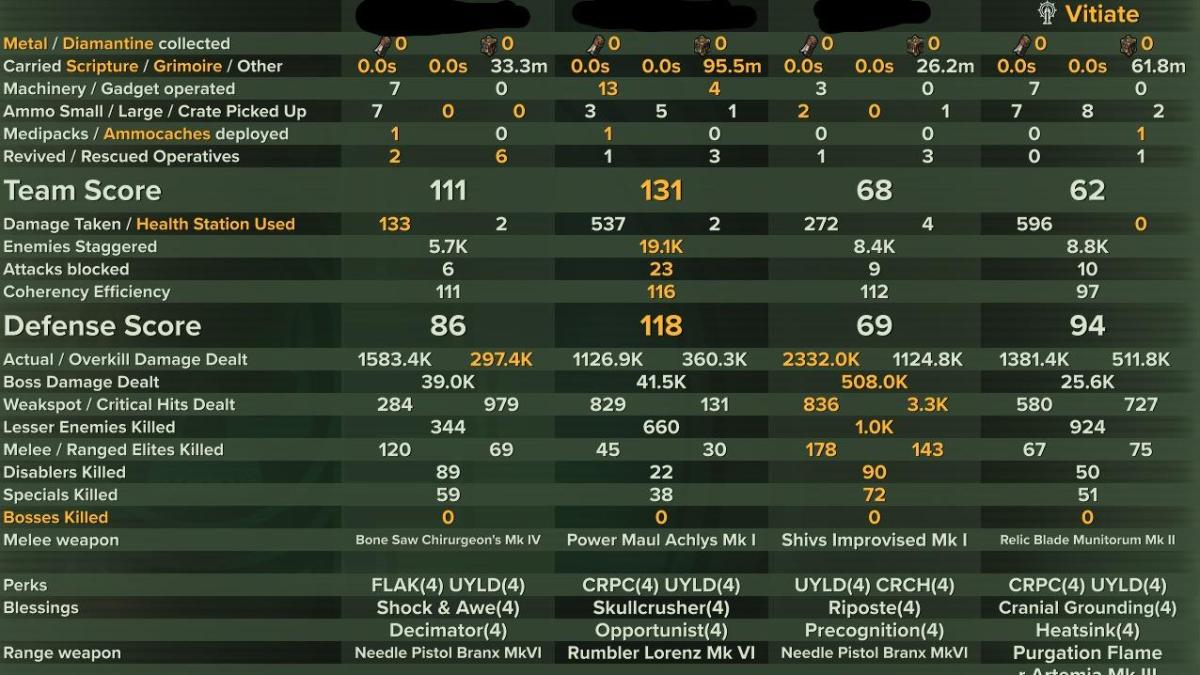
HAVOC 40 | CHORUS MARTYR MEDIC - RELIC BLADE
Here is my H40 build for a Battle Medic Zealot build using Chorus, Martyrdom, Relic Blade and Flamer. This build combines various elements of other builds. Be sure to check out those guides in my profile.
BUILD CONSIDERATIONS
MELEE
- Relic II (or X)
- Carapace, Unyielding
- Cranial Grounding, Heatsink
- Moveset for II (My preference of Marks)
- Bosses
- Impale Killshot
- Block Cancel > W + Sprint > Stab
- Not as powerful without Shroud or Fury, but you can still initiate this way or use this to sprint+slide your way around
- The most common error made when mastering this is that people will dodge backwards/sidewards and not Block Cancel and move forward.
- Impale Killshot
- Elites & Bosses
- Light > Light
- Light > Light > Heavy / Heavy x Repeat
- Light > Light > Heavy / Light x Repeat
- Block Push > Light > Heavy x Repeat
- Hordes
- Heavy > Heavy / Light > Heavy x Repeat
- Block Push > Heavy > Heavy > Heavy / Light > Heavy x Repeat
- Bosses
RANGE
Purgation Flamer
- Unyielding, (Maniac or Carapace)
- Blaze Away, (Overpressure or Penetrating Flame)
CURIOS
- +1 Wound - Revive, Toughness, Stamina
- +1 Wound - Revive, Toughness, Gunner
- +17% Toughness - Toughness, Gunner, Stamina
The combination of Enemies Within, Enemies Without, plus 3x 5% Toughness Curios basically gives you two +17% toughness curios, Restorative Verses, Faith's Fortitude and the 2 Wounds allow you max out Martyrdom stacks granting all the Damage Reduction.
You will be very tanky, and very clutch.
TALENT SWAPS
H40 TIPS
A few tips when playing the character
- Martyrdom Stacking
- Ideally, you obtain all Martyrdom stacks without corruption. This will be done via hitting barrels ASAP.
- Hit a barrel, stand in fire, or get exploded into the air to take damage to start getting stacks up.
- Ideally, you obtain all Martyrdom stacks without corruption. This will be done via hitting barrels ASAP.
- Relic Blade Heat Management
- Micromanaging this is key. The Blessings will help mitigate heat build up. But you will still have to be mindful of things
- A few strategies here
- Get used to swapping back and forth while moving to turn off the weapon and trigger cooldown
- Once maxed out Martyrdom stacks are achieved
- Prioritize the following for activating the weapon
- Carapace / Elites
- Reapers
- Bulwarks
- Gunners
- Specials
- Trash mobs
- It's important to note that Specials and Disablers die very quickly to a non-activated Light > Light OR Light > Light > Block Cancel x Repeat
- Don't waste heat if you don't have to
- Trash mobs can be killed fairly easy without heat
- Don't waste heat if you don't have to
- 1-3 Gunners, Specials, Trash
- Don't waste heat if you don't have to
- Prioritize the following for activating the weapon
- Mixed hordes
- If you do overheat
- Retreat > Switch to Flamer
- By about 50% done with Flamer you should be back to using your Relic Blade if you have to
- Retreat > Switch to Flamer
- If you do overheat
- Chorus - More specifically Chorus Dysfunction aka CD.
- CD unfortunately happens to many Zealots. Every Havoc 40 Zealot will experience Premature Chorusing at some point.
- ED jokes aside...
- Here is your guide to the ability
- For the love of Emperor and all things beneficent - STOP Chorusing when nobody is around.
- Your Toughness & Coherency will automatically restart and anyone low/out of toughness will get it back.
- Since there are no enemies then so much for procs of Invocation of Death to get CDR.
- You are now effectively half of your build going into the next fight.
- Did I say stop doing this?
- Horde density considerations
- Very dense -
- IF Chorus is ready - This is the trickiest part. You want to pull as much aggro to cause it to clump up, especially Rotten Armour. This will allow you, as well as many other allies/builds to maximize damage potential.
- Then Chorus
- IF Chorus is NOT ready - Switch to flamer, and dodge away from attacks. Be as close as possible to maximize Anoint in Blood damage boosts. Keep flaming until you have to switch back to melee to fight or run away.
- Again, engage until you get chorus back. Re-evaluate horde density and repeat.
- IF Chorus is ready - This is the trickiest part. You want to pull as much aggro to cause it to clump up, especially Rotten Armour. This will allow you, as well as many other allies/builds to maximize damage potential.
- Medium to Small density - don't Chorus unless someone is getting overwhelmed. You always want Chorus available when things get out of control.
- This is where the biggest mistakes happen. People will Chorus when no threat is present. Then when things do get out of control their ability isn't ready.
- You effectively neuter your build when you need it most.
- Very dense -
- For the love of Emperor and all things beneficent - STOP Chorusing when nobody is around.
- Frontlining & Pushing Gunner Lines
- Sprint+sliding will be the name of the game to close distance.
- Rotten Armour
- The Relic II strikedowns actually cause a good amount of stagger.
- If surrounded, play whack-a-mole with the horde as you dance around to help stagger and pick them off.
- Boss Fights
- As Zealot, you will be able to solo any boss in the game. Sure Nurgles will be annoying but you have dodges, heavy attacks, parries, and any corruption will be cleansed away via Beacon of Purity.
- If any Special shows up, peel away and knife them. And go back to the boss.
- As Zealot, you will be able to solo any boss in the game. Sure Nurgles will be annoying but you have dodges, heavy attacks, parries, and any corruption will be cleansed away via Beacon of Purity.
- Clutch Revives
- With 45% Revive Speed, you are the uber-clutch revive class in the game.
- As noted in several of my builds - Even though I present many as damage dealer builds, I pride myself (as should you) on being a good teammate.
- When NOT to Chorus - Few people around and no imminent threat of Gunners or overheads
- Just revive. I'd probably say 20-30% of your revives the character will be shocked at first how quickly they spring back up.
- When to Chorus -
- When in a sea of bodies. Chorus to clear.
- Use the Frontlining & De-aggo'ing tactics outlined for Gunners/Reapers in addition to approaching the downed teammate.
- If no one shows up you have a window to revive without getting hit at all.
- When in a sea of bodies. Chorus to clear.
- When NOT to Chorus - Few people around and no imminent threat of Gunners or overheads