Table of Contents
Class

Weapons


Confident Strike
+8% toughness on Chained Hit.
Skullcrusher
Target receives 4 Stack(s) of +10% Damage if already Staggered. Lasts 5s.

Can Opener
Target receives 10-16 stacks of 5% Brittleness on weapon special hit. Lasts 5s
Terrifying Barrage
Suppress Enemies within 8m Radius on Close Range Kill.
Curios

+17-21% Max Health
+17-21% Max Health
+17-21% Max Health
Talent Tree
Description
I've had a lot of people in pub games say the Ogryn Slab shield is not a viable choice for Damnation, so I figured I'd put my build up and explain:
The build has a specific playstyle required to get the most out of it, but can be varied slightly by a changing one or two Feats.
Good positioning and a watchful eye on your puny team mates are something that will serve you well, as you'll be constantly having to reposition yourself to wherever the incoming threat to your team is, which might change simply because they move.
Your goal is to be a damage soak and beacon of attention for every enemy you can, giving your team mates time and space to dish out the damage. This is especially helpful when breaching into an open area with many ranged enemies or gunners.
Be standing about 10 metres out front, just off to a side as to not impede the headshots that will surely be coming from that Veteran's Lasgun, with your shield up and bash at any enemies that come towards your team. Notice I said “team” and not “you” here, you can block both ranged and melee attacks unendingly, you only need to intervene if something turns it's attention away from you.
Orox Mk III Slab Shield: (Note: Keep in mind this is not your damage output weapon)
- Modifiers
- Crowd Control and Defences are the main priorities for this build.
- Damage is your next best after those.
- Perks
- Block efficiency allows us longer mobile time without having to post up with our Defensive Stance
- Sprint efficiency allows us to move around the battlefield more often without compromising our Block uptime
- Blessings
- Confident Strike is a necessity, it will be your main form of Toughness regen during hordes or encounters with a lot of melee enemies
- Skullcrusher takes advantage of our extremely high melee Impact numbers, and further allows teammates to bring down large threats quickly
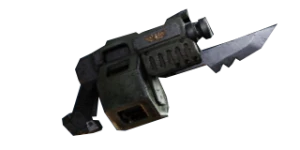
Mk II Ripper Gun:
- Modifiers:
- Damage and Collateral are the main priorities as your Ripper is implemented to soften up large hordes/packs before pushing in for melee or quickly dispatching a Crusher or two
- Stability and Range are close, Stability gives you consistency in damage output and Range pairs well with our Terrifying Barrage Perk
- Perks
- Damage (Maniacs) comes in useful as large groups of Maniacs can quickly overwhelm you, best to break their lines with your Ripper
- Ranged Damage (Elites) is generally just an excellent choice for a Ripper, the Mk II in particular because of it's high burst damage
- Blessings
- Can Opener is still extremely powerful even after a nerf. At Lvl.4 you reduce an enemies armor effectiveness by 40% with a single stab which ties in with our primary objective of the build, to allow our teammates to do their work
- Terrifying Barrage is very effective when pushing through long straight hallways full of ranged units in cover, and can be utilized if a large horde is surrounding your team and you need to give them a second to catch their breath
Feats:
- Best Form of Defence…: Gives us the option of a powerful Toughness boost if things are getting dicey, and pairs well with Blood & Thunder. If you want to use Lynchpin and take a more stood back approach, but affords us no help if you happen to get separated without a Bull Rush.
- Blood & Thunder: Synchronizes very well with our first Feat, and is a considerable boost in DPS when used on tightly packed groups of enemies. Heavyweight is no good for us, as we're not here to kill Ogryns, just beat ‘em up a little. Bomb’s Away! can be swapped in here, and works well with Lynchpin if you chose that.
- Towering Presence allows us peace of mind when pushing forward a little when necessary, as our coherency Toughness regen is vital to the build and your teammates lifespans. If you're particularly trigger happy with your Bull Rush, Lead The Charge and Bullfighter can be used, but not recommended.
- Hard As Nails: If we fail in our job to protect the punies, it's our job to pick them back up ASAP, remember, you're not there to kill things; they are. Bloodthirst won't be as useful as you think, unless you're playing with a Preacher or another Ogryn using a bleed build.
- Knock ‘em Down, Beat ’em Up: Is the only viable choice for this build if you play it correctly.
- Unstoppable: I find this to be the best choice in this tier for Damnation play, as you'll have large packs of Ogryns attacking regularly.