Table of Contents
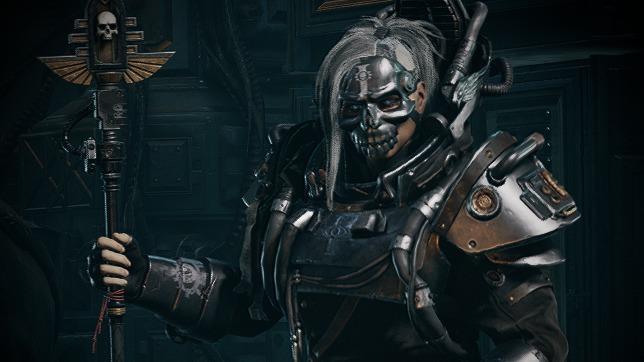
Class

Weapons


Deflector
This weapon Blocks both Melee and Ranged attacks. Additionally, Block Cost is reduced by -30%.
Unstable Power
Up to +20% Strength, scaling with Peril.

Blaze Away
+8% Strength for every 10% of magazine spent during continuous fire. Stacks 5 times.
Warp Nexus
Gain between 5% and 20% Critical Chance based on current level of peril.
Curios

+13-17% Toughness
+13-17% Toughness
+13-17% Toughness
Talent Tree
Description
EDIT (June 6th, 2026): Due to the fix (?) of Uncanny Strike no longer applying to soulblaze DoTs, I changed it out for Unstable Power. I think this is the best blessing for general purpose use, since you don't need to spread soulblaze with the sword and you only pull it out occasionally, and when you do you'll most certainly be at high peril to maximise the usefulness of Unstable Power.
EDIT (October 17th, 2025): Blocking efficiency and stamina regen don't feel as useful as they once did, so I've experimented with just bonus toughness and the assist speed (revive speed) on curious, and I find them way more useful now. I also dropped Essence Harvest for Vulernable Minds recently, I and haven't noticed a change in my survivability but a noticeable change in crusher and monstrosity DPS. If you find yourself needing toughness more than extra damage on big things, feel free to stick with Essence Harvest.
EDIT (September 25rd, 2025): With the new talents and talent tree arrangement, not much changes with this build. Still avoid Wildfire by taking Empyric Shock (because Empyric Shock is great and Wildfire is garbage), and once you're comfortable riding the red line definitely try out the new Warp Ghost (and if you're not used to tryharding max peril, then consider swapping Essence Harvest for Inner Tranquility or Battle Meditation). I think it's fantastic for this build/play style, and I've even dropped my +3 Stamina curio for a third +17% Toughness curio. Also, with the recent changes to Kinetic Flayer, I think you can definitely make the argument to use it over Kinetic Resonance. I say this is up to playstyle. I prefer having control over my damage/abilities so I'll stick with Kinetic Resonance, but if you prefer Kintetic Flayer proc for spike damage and igniting packs of elites faster then by all means use it.
EDIT (April 12th 2025): After trying this build on high level Havoc, I recommend dropping Blaze Away on the staff for Penetrating Flame. That seems to be necessary for how ridiculous the enemy resistances become. Keep Warp Nexus because despite the crit resistance of enemies, the crits still apply extra soulblaze DoTs as well as proc your survival and damage talents. I don't enjoy high level Havoc because I hate fake difficulty, so I have little else to recommend for this build in regards to Havoc.
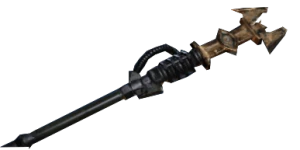
EDIT (December 13th 2024): I changed the Unstable Power blessing on the Deimos sword to Uncanny Strike thanks to Tanner's video about this build. I had no idea that the Rending from Uncanny Strike applied retroactively to every instance of already-extant soulblaze DoT. That is ridiculous and I have no idea why it works that way, but it's incredible for melting thick packs of armoured enemies. I highly recommend checking out Tanner's video about the meta for this build, and you can find it here:
The goal of this build is to be an all-rounder that pumps out tremendous amounts of damage to everything as well as slow/stagger incoming ragers & horde all while being tanky enough to handle about anything when things get rough.
With this build you want to stay at high peril at all times. Use Brain Rupture to keep your peril high between engagements and use it at the beginning of a fight to pop a rager, gunner, or specialist to spike your peril so you can dump a max Creeping Flames Venting Shriek into the mixed horde before going hard with the Purgatus/Inferno staff.
Why stay at high peril? Because this build hinges upon using Venting Shriek to apply 6 soulblaze stacks to everything in the huge 30-35 meter cone (which affects things even through hard walls) as often as possible. You only need 80% peril to apply max stacks, so you don't have to be at max peril for this purpose. Using Venting Shriek effectively and often relies on two things. First, make sure to use In Fire Reborn instead of Psychic Vampire, because that choice + Psykinetic's Aura + 12% CDR from curios means you'll be able to Shriek every 8-12 seconds in heavy combat, sometimes even faster (often on Aurics I can Shriek again almost immediately after using it). A trick to Shrieking often as possible is to watch the healthbars of the specials & elites in the horde and Shriek when you see many of them are about to die, that keeps your Warp Siphon charges up to further reduce cooldown on your Shriek. Proper usage of this and the Purgatus/Inferno staff will easily max out your soulblaze DoTs on the OpFor in seconds (which leads to triple-digit DoT damage per tick).
Speaking of the staff, remember to use left click and right click correctly. Use the left click to hammer packs of ragers and mixed hordes of ragers, shotgunners, and regular guys to keep them staggered, and in between you can hose them all with a partially charged right click to max out the soulblaze DoT. With the rework of Psyker giving us the ability to apply Empyric Shock via staff left-click, this means you should lean heavily on left-click for most engagements, especially when beginning an engagement to optimise your DPS. The Blaze Away blessing is easy to keep maxed by spamming left-click, but you can also keep it up with right-click by sending out short 1-2 second pulses. You should use the partially-charged right-click to rapidly max out the DoT on bosses as well (soulblaze DoT + force sword stabs when available are a better contribution to boss damage than trying to land a few Brain Ruptures).
Obviously the build isn't great against bosses, but since you can rapidly max out soulblaze stacks on bosses it will contribute more than you might think (especially if bosses live longer than 5 seconds). If you're good at the boss "dances" you can land powerful hits on them with the force sword heavy attacks to add to your DoT damage.
The Deimos sword is great for handling bulwarks, crushers, and maulers, which is the only thing the staff + Shriek can't rapidly melt via soulblaze. I use this sword for 3 things. First, I empower it before a strike if I absolutely have to lockdown an armoured enemy (like if a crusher is bearing down on an ally and I need to stop it more than kill it, works on mutants too like side-stepping and sticking it with a revved up chain weapon). Next, I use the second heavy attack in the combo to land powerful lancing blows on armoured enemy heads to deal spike damage and knock them down. This allows me to effectively "dance" with packs of maulers and crushers while rather quickly killing them, especially if I have already loaded them up with soulblaze DoTs. Finally, I use Deflector + Block Efficiency to allow me to be able to block-tank bosses and lots of melee enemies at once when I need to, and if I need to cross an open area or pick up a downed ally it's nice to be able to block ranged fire.
Talent Options: If you don't like the short period of rapid Brain Rupture from Kinetic Resonance, feel free to drop this. It's totally optional and you don't need it, I just enjoy using it for rapidly popping gunners and specials when the time is right. You could trade Kinetic Resonance for Kinetic Deflection to keep your peril high and effectively double your Block Efficiency when things get rough. Another decent option would be picking up Quietude or one of the +15 Toughness nodes if you're having trouble with chip damage. You should avoid nodes which reduce peril because once you're comfortable with this build those nodes only become a hindrance to optimal output.
Equipment Options: The melee weapon is up to you. I only use the Deimos sword for the specialised applications I outline earlier, but if that doesn't work for you then feel free to use whatever you're comfortable with to keep you alive. My other recommendation would be the Dueling Sword since it serves a similar role and will help keep you alive with an even better dodge & better damage against crushers than the Deimos. In regards to curio perks, the CDR is mandatory for this build, but the others are up to you. I prefer stamina regen + sprint efficiency since I utilise the movement boost from Mettle to rapidly sprint/slide around the combat zone for optimal AoE placement of my staff & Shriek cones as well as making sure I'm near the front lines (it costs a lot of stamina to keep up with Zealots haha); I also block a lot so I run block efficiency on every one of my builds. Good curio options if you don't like these would be bonus toughness or revive speed. I consider all choices for the Purgatus/Inferno staff to be mandatory for this build.